Windows Defender is the built-in anti-virus software of the Windows OS. Although not as good as the other third-party anti-virus applications, it is pretty good. Moreover, the software is free and Microsoft regularly updates the software. However, there are some instances that you might want to remove or temporarily disable the software.
In this article, we explain two ways by which you can disable or remove the Windows Defender in Windows 10. Also, remember to install any good third-party anti-virus software that suits you before you disable Windows Defender.
Via Windows Security setting
This is the easiest method to disable Windows Defender. In case you are facing issues with downloading any file or an app, then you can use this quick way to stop Windows Defender. To stop Windows Defender, follow the steps given below.
Step 1: Search Windows Security in the taskbar. Alternatively, you can go to Settings > Update and Security > Windows Security.  Step 2: Click on Virus & threat protection.
 Step 3: Scroll down and go to Manage Settings.
 Step 4: Turn off the toggle under the Real-time protection.
As you can see from the above screenshot that Windows Defender is already off. This happens when you install some other third party anti-virus app. But you get the idea nonetheless.
Also, when you feel that you need to turn on the Windows Defender, just follow the steps given above and then turn on the toggle.
Also Read: How to check computer specs in Windows 10: 4 ways explained
Using the Windows Registry
Windows Registry or simply Registry is a database of settings related to hardware and software of the operating system. You can use this tool to disable Windows Defender. Step1: Using the keyboard, type Windows key + R.
Step 2: In the Run window, type regedit and then click OK. Step 3: Go to the following path — HKEY_LOCAL_MACHINE\SOFTWARE\Policies\Microsoft\Windows Defender. You can do it manually or can copy the above path in the search box.
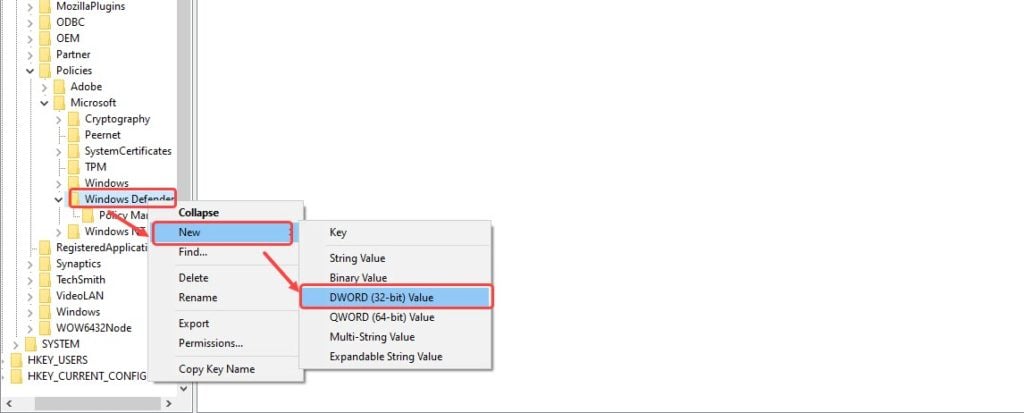
 Step 4: Right-click on the Windows Defender folder and then go to New > DWORD (32-bit) Value.
 Step 5: Rename the key as DisableAntiSpyware and then press the Enter key.
 Step 6:Then double click on the new key and then set the value to 0 (zero) to 1.
That’s it! You have successfully turned off the Windows Defender.
If you are a layman in computer technology, we advise that you refrain from using or manipulating Windows Registry settings. If, in any case, you want to continue, do backup your data first.
For more such how-to articles, visit our Tech Basic section here.
Also Read: 3 ways you can delete temporary files in Windows 10


