Skip to content

How to map and access Webdav drive in Windows 10?

  • by
  • 4 min read
User experience is often elevated by the use of third-party software. These software can give you anything from stats monitoring to productivity boosts. In this article, we bring you the top five windows software/apps every user should have. Note that some power users might already be aware of them. The programs on this list are pretty common. Rainmeter Rainmeter is a program used to create perplexing windows desktops. Below is my own desktop, modelled after a Bumblebee theme. My desktop, modelled using Rainmeter Using Rainmeter can take your Windows Desktop to a whole new level. There are already hundreds of amazing skins available to download for a variety of resolutions. You can just download them and get started. The program provides both utility and productivity. Most Rainmeter skins include stat monitors, custom program launchers, notes, weather updates and so on. Not only this makes your desktop look infinitely cooler, but it also provides for a good, well-organised desktop. The software is open-source and so are the skins. Anyone can create, modify and reuse the skins to their heart's content. You can get Rainmeter here Also read: How does Windows 'Disk Cleanup' work? 10 things it does f.lux f.lux is cross-platform software which changes your screen's colour temperature according to the time. During the daytime, computer screens look fine. They're designed to look like the sun. But at night, when you're busy blasting away at your desktop, it's probably not a good idea to stare at a screen like that. f.lux fixes this. Much like the night mode on many smartphones, f.lux controls the blue tint of computer screens according to the time of the day. Making it warmer as the night passes by. This can save your eyes some serious strain. You can get f.lux here AVG PC TuneUp AVG PC TuneUp (previously TuneUp Utilities) is a software suite with a bunch of extremely useful utilities up its sleeve. It is an all in one management suite for your PC. You can manage your storage, diagnose hardware issues, fix registry issues, fix broken/missing drivers, update firmware/drivers and what not. The app also has anti-malware systems built in. The Game Mode in the app temporarily boosts your computer's performance so that you can get better performance in your games. As aforementioned, the app also has a bunch of excellent memory management apps. This is truly the one app you need for all your OS management. You can get AVG PC TuneUp here CPU-Z CPU-Z is also another very useful hardware monitoring app. Essentially it's a freeware system profiling and monitoring software for Windows. Upon installation, it detects and shows the CPU, RAM, GPU, MotherBoard and other hardware components of a PC. It used by PC enthusiasts all over the world for monitoring basic hardware stats. It is an extremely lightweight software too. Also, it barely needs any system resources to run and hence can be used on a wide variety of systems. You can get CPU-Z here SpeedFan If your PC runs hot, this software can save your life. SpeedFan is a system monitoring app for Windows that monitors your PC's temperatures, fan RPMs and voltages of various components. Power PC users widely use to it monitor hardware temperatures and voltages especially during overclocking. The software displays system variables as charts and as an indicator in the system tray as well. Depending upon your fan's hardware, SpeedFan also lets you set fan speeds for various components. You can get SpeedFan here Also read: How to manage app permissions on Windows 10?

With data storage being put on the cloud more and more each day, it has become essential to work and collaborate on remote drives. Web Distributed Authoring and Versioning, otherwise known as WebDAV, provides a way to do that.

It is an HTTP protocol that facilitates editing and managing files on a remote web server. In this article, we’re talking about how you can set up a WebDAV on a Windows 10 machine.

Also read: How to view and change Microsoft Store install location in Windows 10?


How to map WebDAV in Windows 10?

The process is actually quite simple. All you need is your WebDAV account login details, the site URL, and a name for your shortcut. Here’s how.

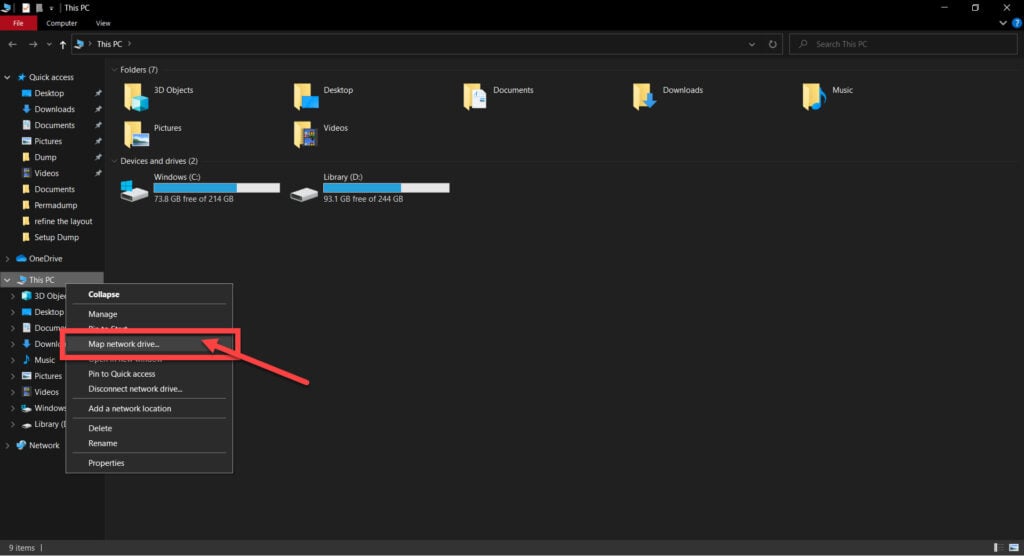
Step 1: Open Windows Explorer and right-click on This PC. Click on Map network drive…
How to map and access Webdav drive in Windows 10?

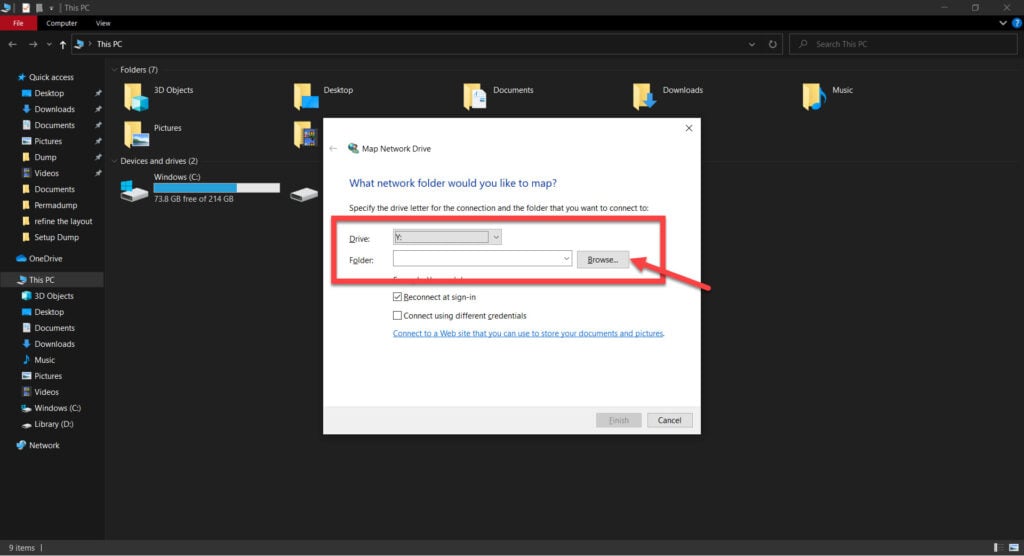
Step 2: Now, enter a drive letter and the local folder you’ll use to add or edit files to your WebDAV.
How to map and access Webdav drive in Windows 10?

Note that you might see an error when you’re adding the local folder stating that file and network discovery is disabled. You can turn it on from the Control Panel inside the Network and Sharing Centre. 

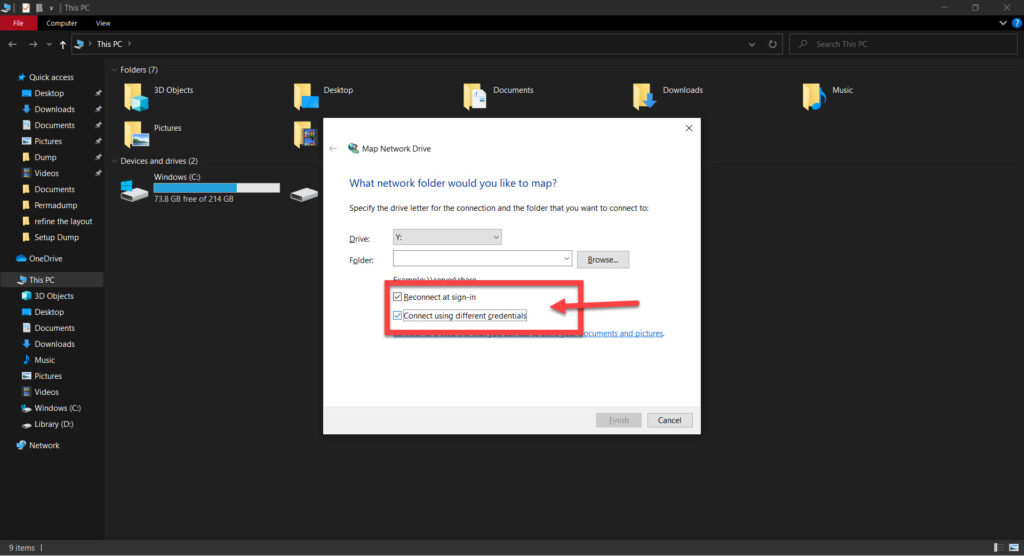
Step 3: Check the Reconnect at sign-in and Connect using different credentials checkboxes. 
How to map and access Webdav drive in Windows 10?

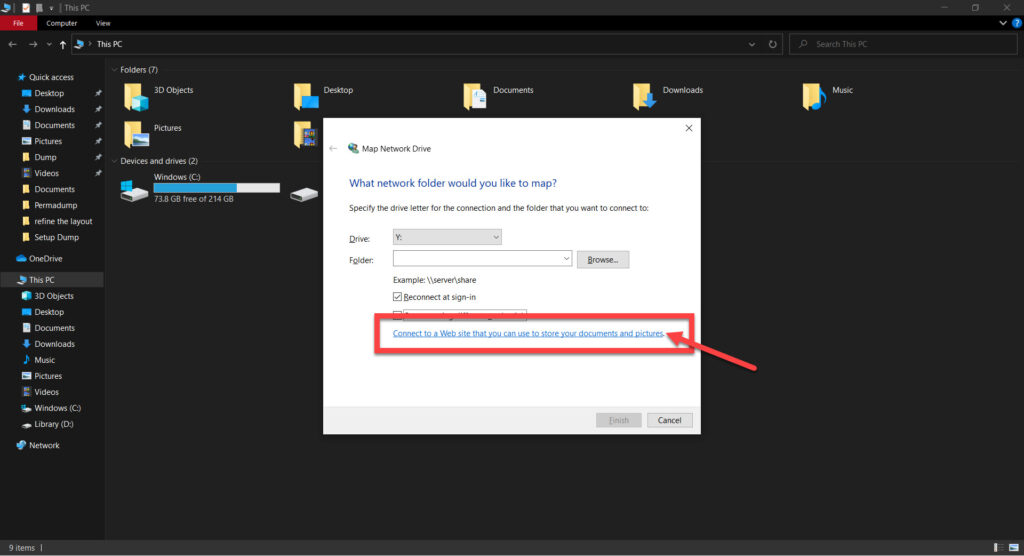
Step 4: Click on the Connect to a web site that you can use to store your documents and pictures link to proceed.
How to map and access Webdav drive in Windows 10?

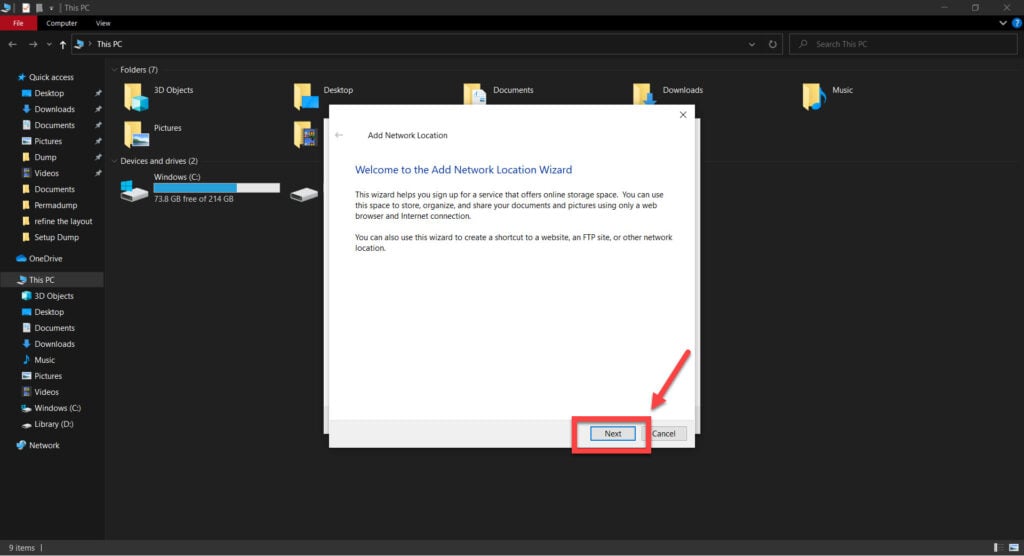
Step 5: Click on the Next button.

How to map and access Webdav drive in Windows 10?

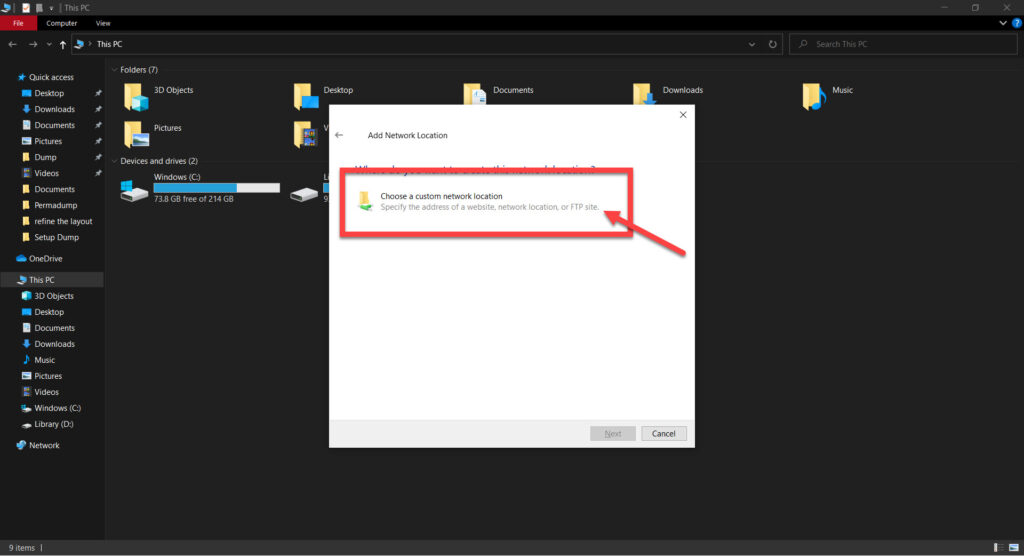
Step 6: Click on Choose a custom network location followed by Next.
How to map and access Webdav drive in Windows 10?

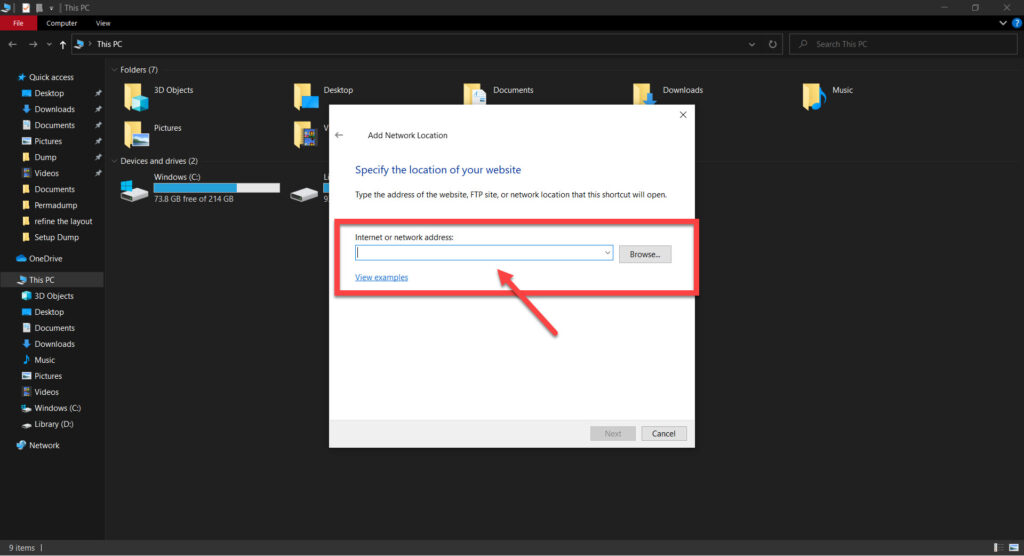
Step 7: Now type in the web address of your WebDAV.
How to map and access Webdav drive in Windows 10?

Step 8: Now you’ll be prompted for your credentials. Type them in and hit Next.

Step 9: The name for your WebDAV should be already filled in, but if you want, go ahead and change it to your liking before clicking Next followed by Finish.

Now you should see your WebDAV ready to access right inside Windows Explorer along with your other drives. 

Also read: Where are Chrome bookmarks located in Windows 10?


How to resolve connectivity issues when connecting WebDAV?

If you’re facing problems while adding your remote drive to Windows Explorer, try changing the basic authentication level from your Windows registry. Here’s how.

Step 1; Press Windows key + R to open the Run prompt. Type in regedit and hit enter.

How to map and access Webdav drive in Windows 10?

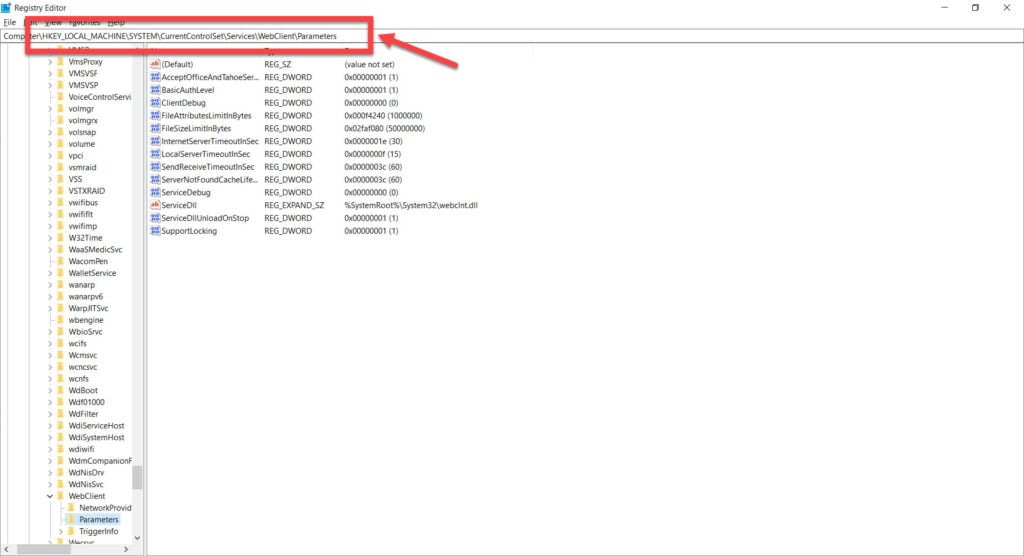
Step 2; Navigate to the following directory.

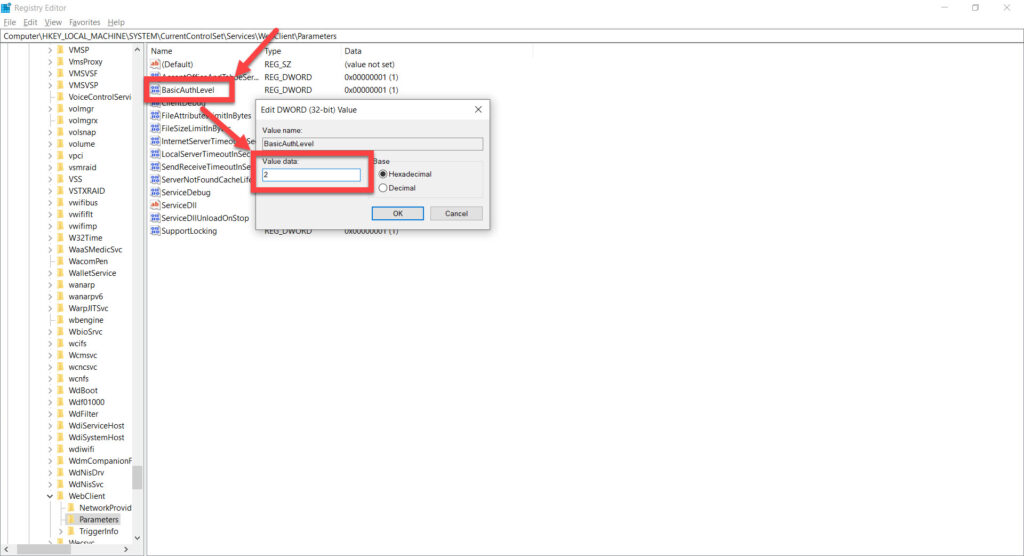
HKEY_LOCAL_MACHINE\SYSTEM\CurrentControlSet\Services\WebClient\Parameters
How to map and access Webdav drive in Windows 10?

Step 3: Here find the BasicAuthLevel key and check its value. If the value is set at ‘1’, double click on the key and change the value to ‘2’. 
How to map and access Webdav drive in Windows 10?

Also read: How to install and use Zsh in Windows 10?

nv-author-image

Yadullah Abidi

Yadullah is a Computer Science graduate who writes/edits/shoots/codes all things cybersecurity, gaming, and tech hardware. When he's not, he streams himself racing virtual cars. He's been writing and reporting on tech and cybersecurity with websites like Candid.Technology and MakeUseOf since 2018. You can contact him here: yadullahabidi@pm.me.

>