Windows 10 has numerous connection issues from time to time but none of them is as annoying as when you can’t connect to a network without knowing why.
This error can be caused by a number of reasons and can be resolved in a number of ways as well. In this article, we’re going to talk about how you can fix this issue and get back online again.
Reboot your PC
As we’ve mentioned before in multiple articles, rebooting your machine should always be the first item on your troubleshooting list. It can solve a bunch of seemingly random issues and can come in really handy when you’re trying to resolve errors.
Also read: How to fix the ‘Google Chrome sound not working’ error in Windows 10?
Try toggling the airplane mode
Just like your smartphone, Windows 10 has an inbuilt airplane mode that turns off all communication devices on your machine. Toggling this mode on and off can at times help resolve any connection issues you’re facing.
Step 1: Press Windows Key + I to open Windows settings and head over to Network & Internet.
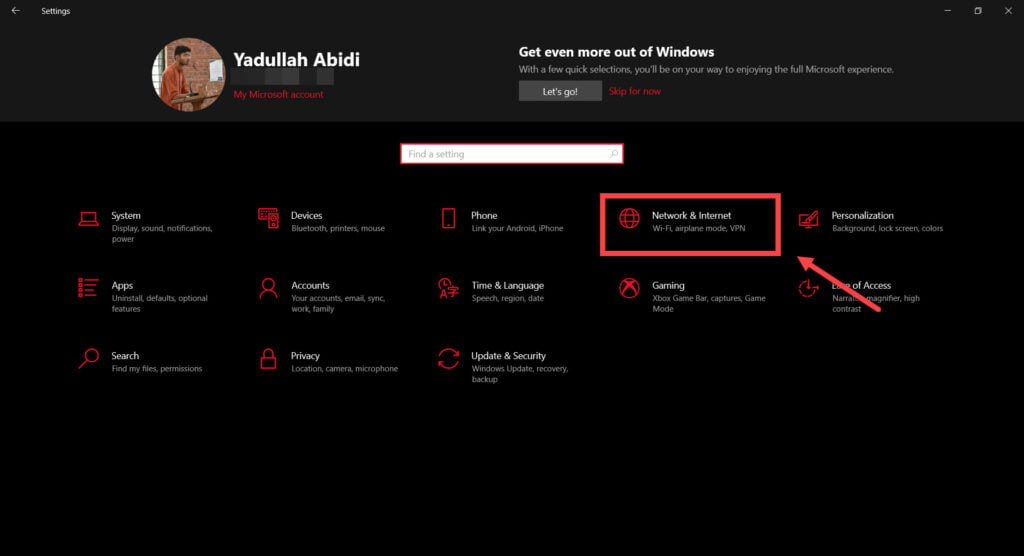
Step 2: Head over to the Airplane Mode tab.

Step 3: Toggle the airplane mode on, wait for a few minutes and then toggle it back off again.

Forget the network and reconnect
Although this is one of the more basic things to do, you can always give it a shot.
Step 1: Press Windows Key + I to open Windows settings and head over to Network & Internet.

Step 2: Head over to the WiFi tab.
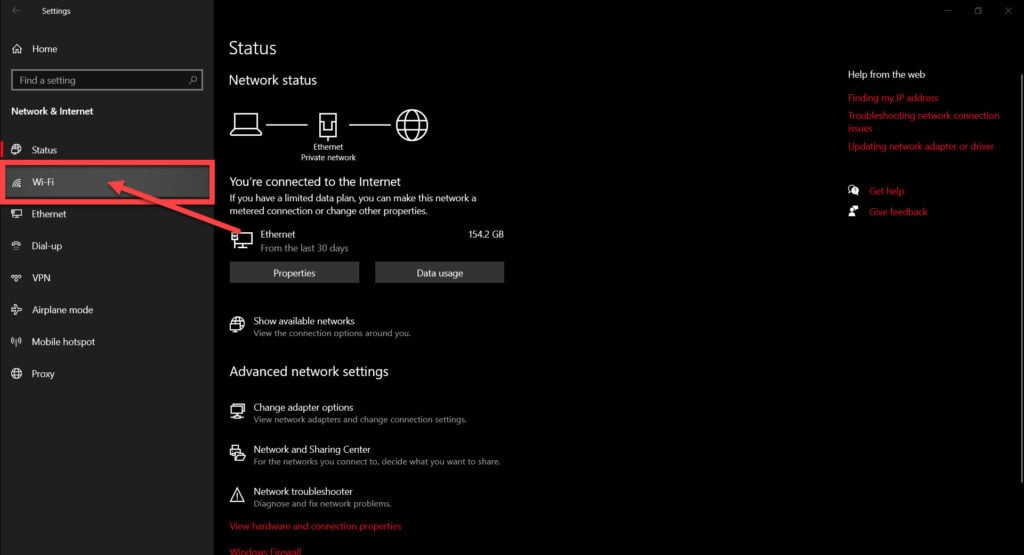
Step 3: Click on Manage known networks.

Step 4: Click on the network you want to forget and click Forget.

You can now try reconnecting to the network as usual.
Reinstall network adaptor drivers
Faulty drivers can cause a lot of havoc on your machines. If your network adaptor’s driver is old or outdated, you can run into connection issues like this.
Step 1: Press Windows Key + X and click on Device Manager.

Step 2: Click on Network Adaptors to show all connected network devices.

Step 3: Right-click on your network adaptor and click Uninstall device.

Now restart your PC and Windows will automatically detect and reinstall the drivers for your adaptor. This should fix any connection issues that you’re facing.
Also read: Top 16 Microsoft Edge Flags you should check out
Flush your DNS settings
Corrupt or incorrect DNS settings can cause internet connectivity issues on any network. Follow these steps to reset these settings.
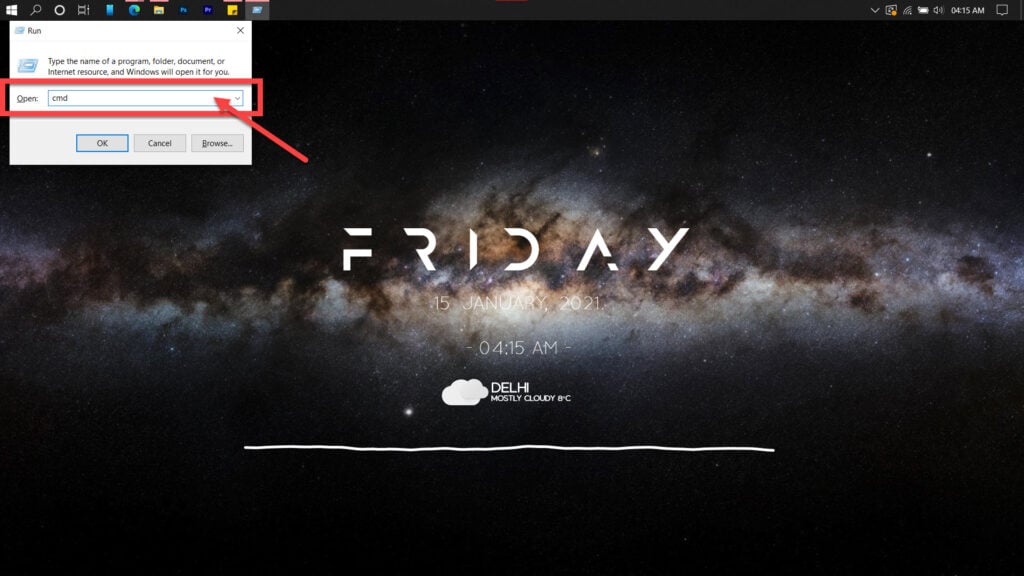
Step 1: Press Windows key + R, type cmd and hit the Enter key.
Step 2: Type in ipconfig /flushdns and hit enter. This will reset your DNS settings to their defaults.
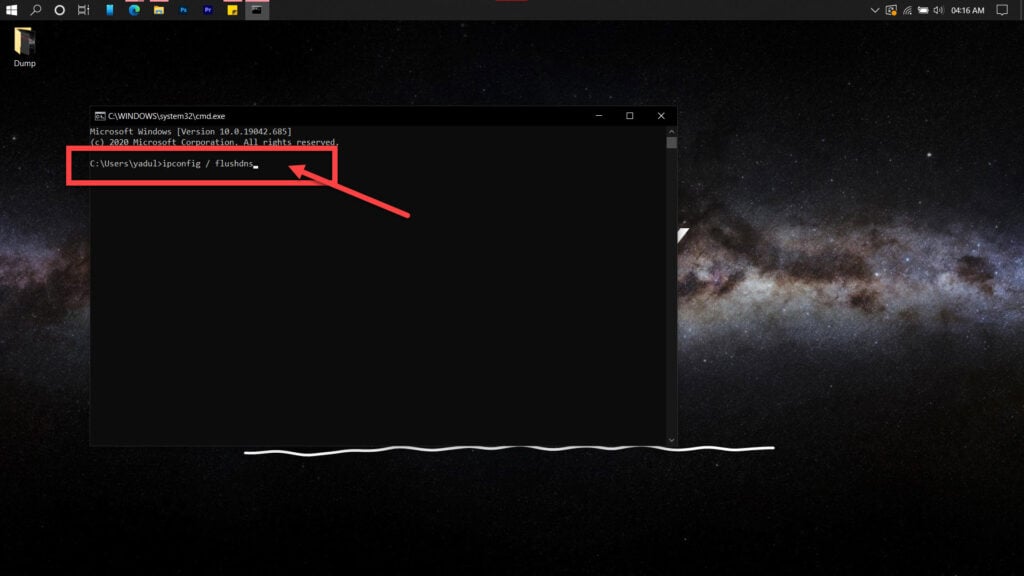
You can try out the following commands as well. Simply enter them in the command prompt one by one and hit enter after typing in each command.
netsh winsock reset
netsh int ip reset
ipconfig /release
ipconfig /renew
Use the Windows Internet troubleshooter
Windows has inbuilt troubleshooters for resolving just about any conflict and sure enough, there’s one for resolving internet issues as well.
Step 1: Press Windows Key + I to open Windows settings and head over to Update & Security.

Step 2: Click on the Troubleshooting tab.
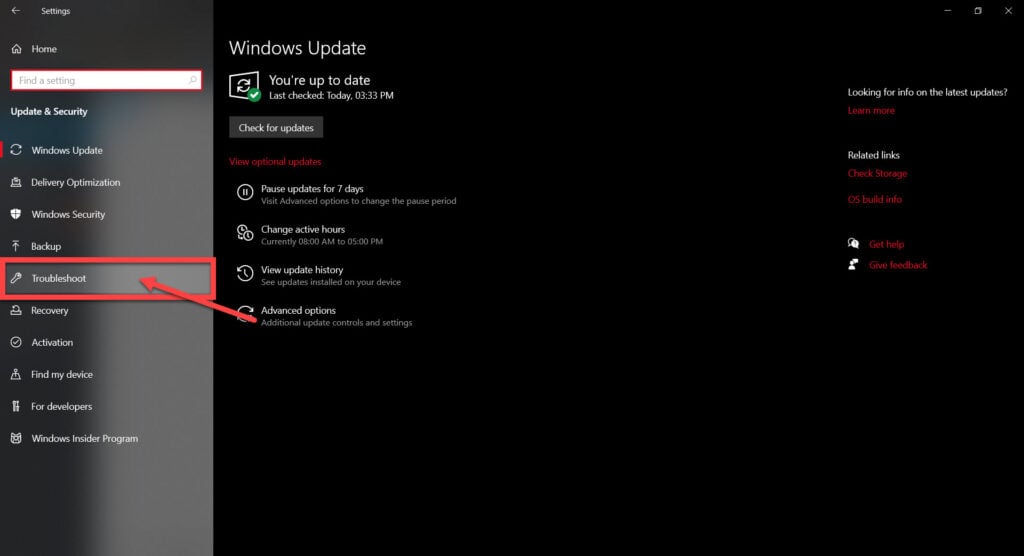
Step 3: Click on Show Additional troubleshooters.

Step 4: Find Network Adaptors in the list, click on it and run the troubleshooter.

Disable IPv6
Most machines can run just fine on IPv4 alone unless you’re working with something that specifically requires the IPv6 protocol. You can try disabling IPv6 on your machine to see if it helps resolve the issue.
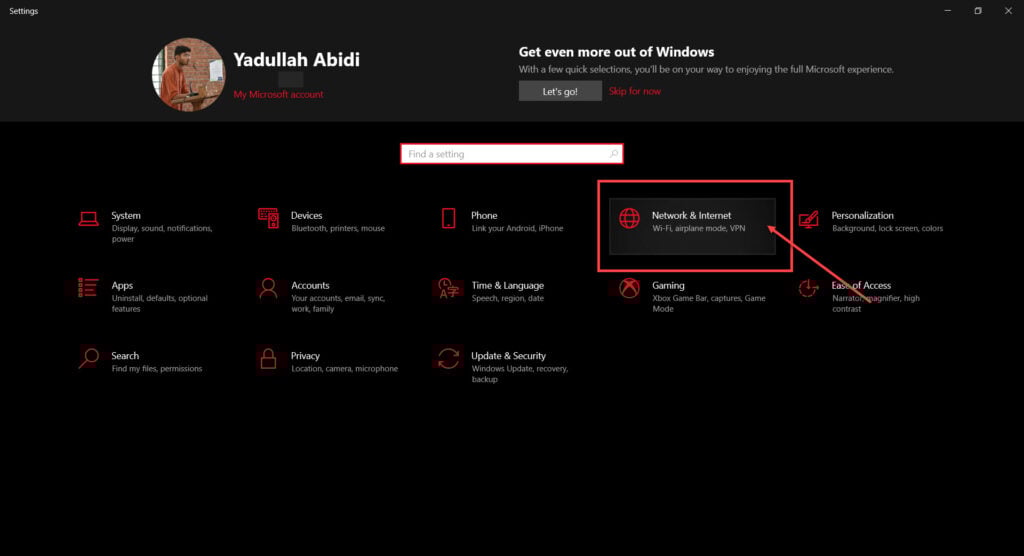
Step 1: Press Windows Key + I to open Windows settings and head over to Network & Internet.
Step 2: Click on Change adaptor options.
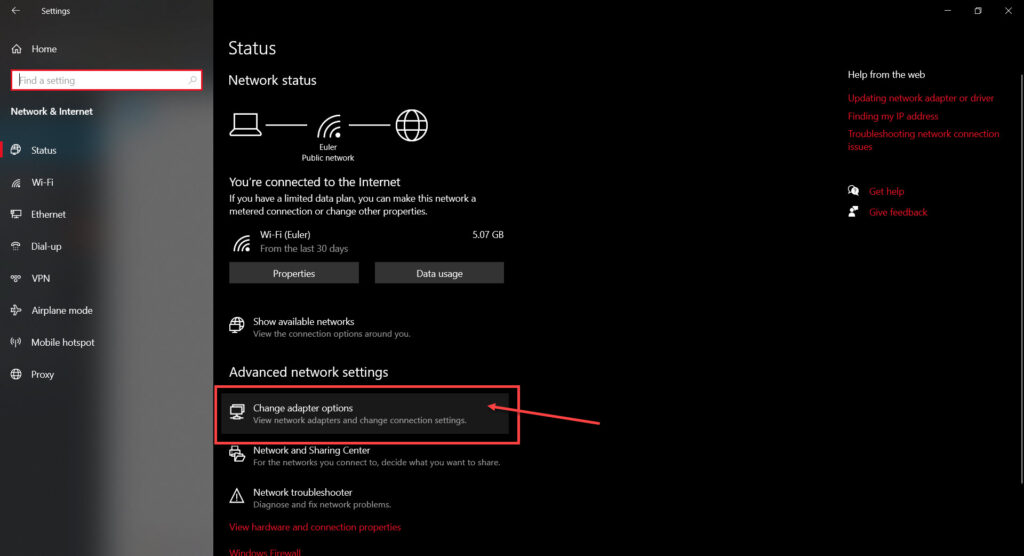
Step 3: Right-click on your active network and click Properties.

Step 4: Find Internet Protocol Version 6 in the list, then uncheck its checkbox.

Also read: What is PowerToys and how to use it in Windows 10?
Change the 802.11 Channel Width
Step 1: Press Windows Key + I to open Windows settings and head over to Network & Internet.

Step 2: Click on Change adaptor options.

Step 3: Right-click on your active network and click Properties.

Step 4: Click the Configure button.

Step 5: Head over to the Advanced tab ad select 802.11 Channel Width in the Property list.
Note that the setting might be noted as Channel Width 2.4GHz or Channel Width 5Ghz in newer machines
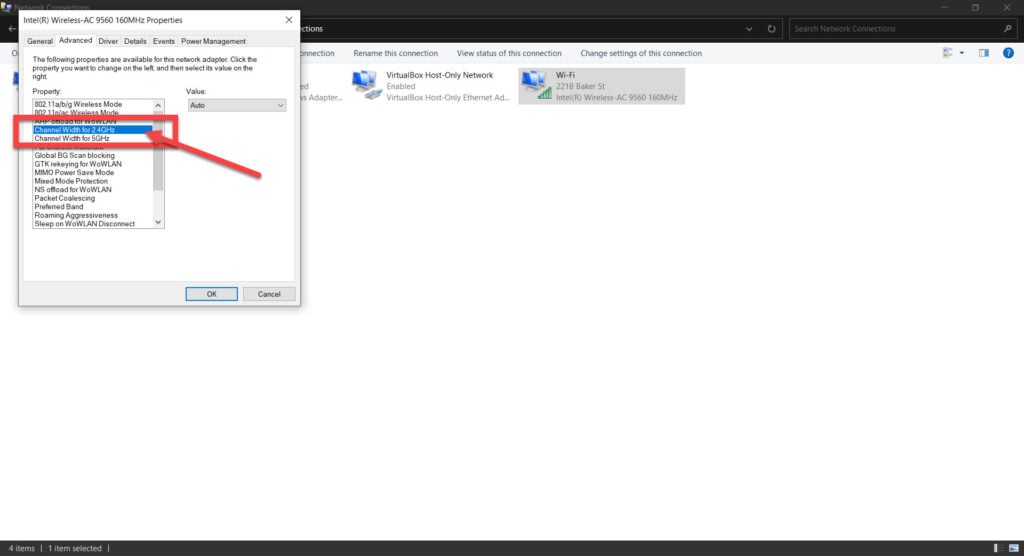
Step 6: Select 20MHz Only in the Value dropdown.

Restart your PC and try again.
Check security settings between router and adaptor
If you’ve got different security settings for your router and for your adaptor, this can cause connection issues for you.
Step 1: Press Windows Key + I to open Windows settings and head over to Network & Internet.

Step 2: Click on Change adaptor options.

Step 3: Double-click on your active WiFi connection and then click on Wireless Properties.

Step 4: Head over to the Security tab and make sure you’ve got the same security protocol in the Security type dropdown. Click OK when you’re done.

Disable the 802.11n mode
Disabling certain network modes can help solve numerous connection issues which might have been caused due to incompatibility issues,
Step 1: Press Windows Key + I to open Windows settings and head over to Network & Internet.

Step 2: Click on Change adaptor options.

Step 3: Right-click on your active network and click Properties.

Step 4: Click the Configure button.

Step 5: Head over to the Advanced tab and select 802.11n Mode in the Property list.

Step 6: Select Disabled in the Value dropdown.
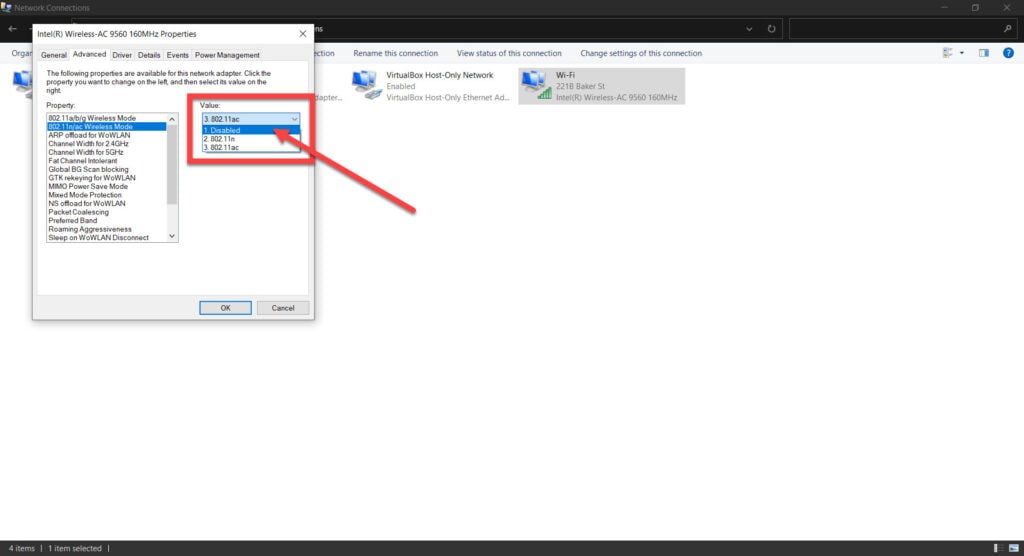
Now restart your machine and try connecting to the network again.
Also read: How to fix ‘Can’t delete folder in Windows 10’ issue?
Add the connection manually
It’s possible that Windows might be messing something up when adding the connection. To counter this, you can try adding the connection manually.
Step 1: Right-click on the network connection icon in the system try and click on Open Network & Sharing settings.

Step 2: Scroll down and click on Network & Sharing center.

Step 3: Click on the Set up a new connection or network link.

Step 4: Choose Manually connect to a wireless network from the list of options.
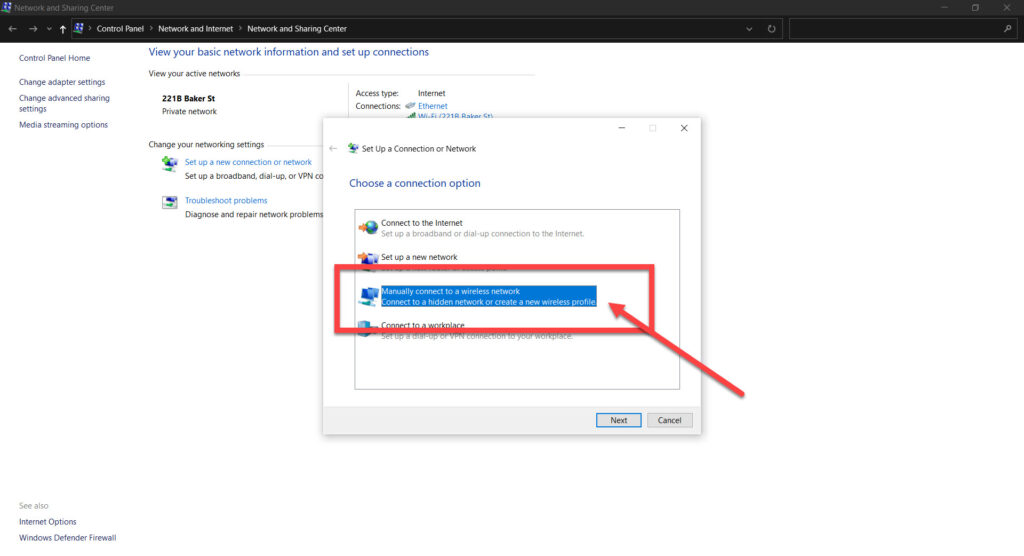
Step 5: Fill in all the required credentials and make sure to select the right setting in the Security type dropdown. Click Next when you’re done to finish the setup procedure.

Try clearing out your WiFi stack
Use the following commands in the Command Prompt to clear out your WiFI stack.
Step 1: Press Windows key + X and click on Command Prompt(Admin).

Step 2: Type the following commands one by one and press enter after typing each command.
reg delete HKCR\CLSID\{988248f3-a1ad-49bf-9170-676cbbc36ba3} /va /f

netcfg -v -u dni_dne
Reboot your PC and try again.
Reset Network Settings
If all else fails, you can try outright resetting your network settings. This is by far the best way to resolve network or connectivity related issues on your machine without having to take drastic action.
Step 1: Press Windows Key + I to open Windows settings and head over to Network & Internet.

Step 2: Scroll down and click on Network reset.

Step 3: Click on the Reset now button to reset your network settings.

Your PC will automatically be restarted and this should fix any issues you’re having.
Also read: 7 ways to fix ‘Can’t open Nvidia control panel’ error?


