Wordpress is a platform where you can create websites, blogs, and other contents. The platform is easy for use and runs on PHP and MySQL.
In this article, we will explain how you can change the footer in Wordpress. Footer is the area at the bottom of the webpage and is usually the same for the whole site. Footer allows you to see the copyright information, about us section, privacy policy etc.
How to change the footer in Wordpress?
If you want to change the footer in Wordpress, there are two ways to do so — Paid and Free. Let us start with the free method first.
Method 1 (free):
To change the footer for free, follow the steps given below.
- Log in on Wordpress.
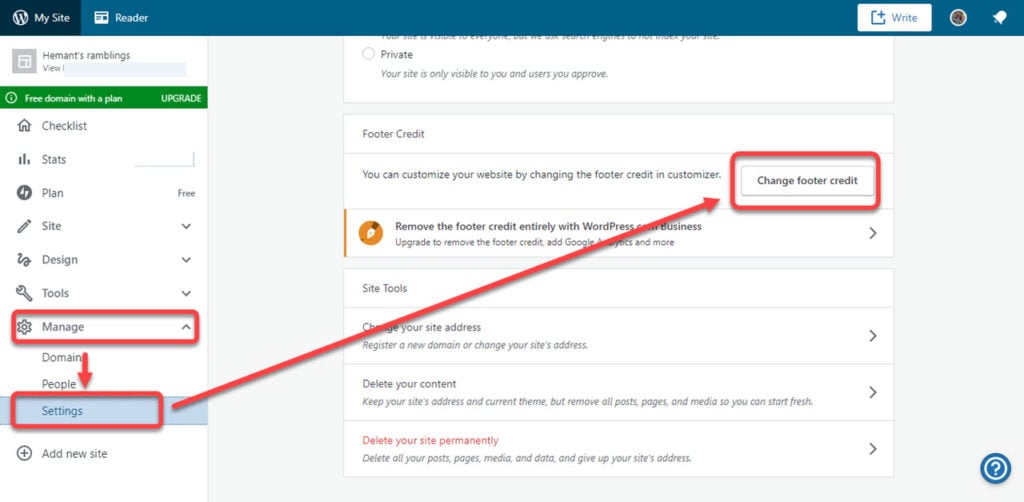
- On the left panel, click on Manage.
- Click on Settings from the drop-down menu.
- Scroll below to see the Footer Credit option.
- Click on Change footer credit.
- After that, click on the drop-down menu under the Footer Credit option. Alternatively, you can scroll down to the end and then click on the inverted pen icon.
- Choose from the given selection of footer notes.
Note: As you can see from the screenshot above, in the free plan, you can choose from a limited set of options. Also, you cannot remove the WordPress branding.
Also read: How to deactivate and delete your Evernote account?
Method 2 (paid):
Need to customise the footer and remove the Wordpress branding? You need to loosen up your pockets a bit for that. You need to upgrade your account to the Business plan, which starts from Rs. 800 per month.
 If you have upgraded already, follow the steps given below to change the footer.
- From the left sidebar menu, click on the Appearance option.
- Then, click on the Customise option.
- You will see a long list of options that you can customise. Select the Footer Text option.
- Edit the footer text and then click on Publish.
Easy enough! We will bring more such how-to’s in the future.
Do write in the comments about any particular how-to or topic that you want us to write on.
Also Read: What is Error 907 and 6 ways to fix it?


