You might come across this message on a black screen on your PC, ‘Fixing (C:) Stage 1’. It shows up on old computers with a Windows OS and an old hard disk. A fixing stage error is part one of a series of four and can be easily solved by you.
This article explains everything about ‘Fixing C Stage 1’ and helps you figure out how to get rid of the black screen.
Also Read: How to stop the ‘Fixing C Stage 2’ issue in Windows?
What is Fixing (C:) Stage 1?
Right now, your computer is running a ChkDsk program to locate and solve any issue with your hard drive. This usually takes a long time to complete. You might notice that the percentage shown on the screen barely increases, which will happen every time you switch on your PC.
A fixing stage 1 issue can arise from the hard disk being either too old or riddled with junk files or a sudden and improper power shut down. Usually, there are four stages of fixing drives.
Also Read: How to fix the Windows Photo Viewer: Not enough memory issue?
4 ways to solve the Fixing C Stage 1 issue
There are four ways to fix the Fixing C Stage 1 error and stop it from recurring whenever you open your PC.
Press shut down
Press the shut down button for two or three seconds. Not too long to actually shut it down, but to check if there are any changes on your screen. If your screen remains the same, you can try the following three methods.
Run Registry Editor
The Microsoft Windows Operating System has a registry that stores information regarding types of hardware and programs to be presented after startup. Usually, editing a registry is left to professionals as it is a sensitive job where any mistake can lead to loss of information; however, here, we direct you safely according to the steps:
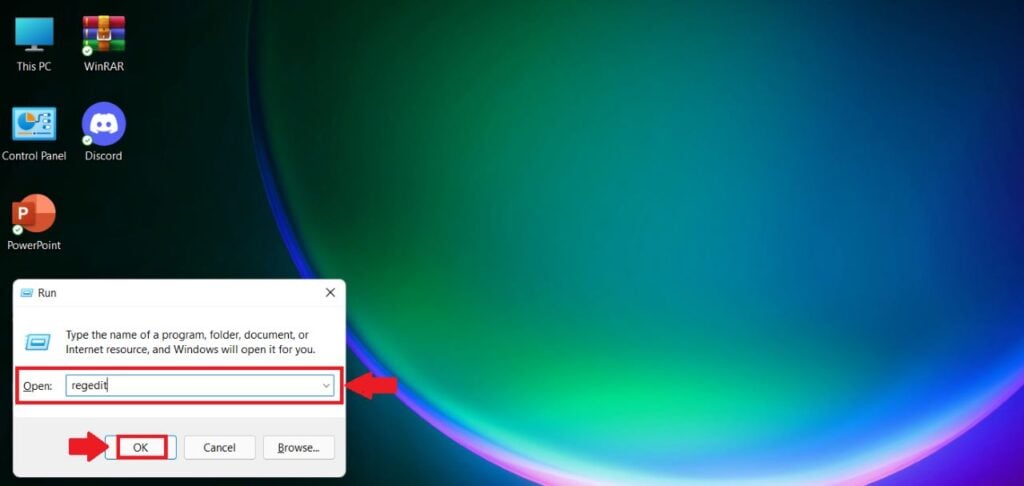
Step 1: Go to your desktop and press the Windows key + R to open the Run command. Type Regedit and press OK; this will take you to the Registry Editor.

Step 2: A prompt opens up, asking permission to allow the registry editor to make changes on your laptop. Allow it. On the navigation bar, type:
HKEY_LOCAL_MACHINE\SYSTEM\CurrentControlSet\Control\Session Manager

Step 3: Search for BootExecute from the list shown in the Session Manager, and when you click on it, a box pops open.

Step 4: Correct the entered data autocheck autochk * to autocheck autochk /k:C *. Save changes and exit the editor. Restart your computer.

Also read: Computer vision vs Image Processing
ChkDsk Command prompt
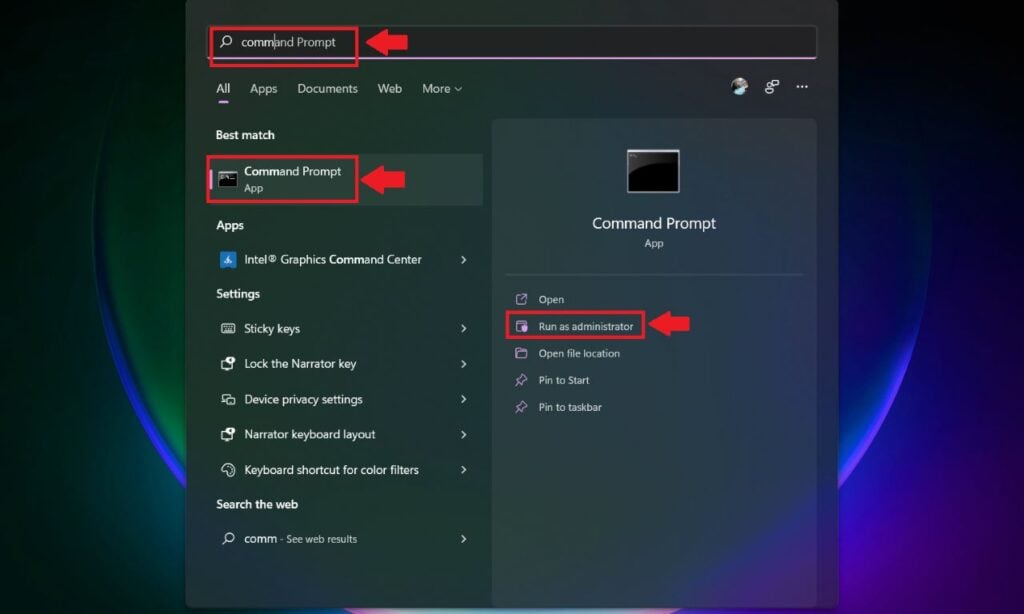
Another way to cancel ChkDsk is by running a command prompt as administrator. You can search for it on Windows search as Command prompt. From the options shown, click on Run as administrator and then type the code. chkntfs /x c:

Running this calls off the ChkDsk command and the letter c: stands for the drive undergoing checking and fixing.
Further fixes
You can always back up your computer files beforehand and get a new hard drive with Windows. You can copy your files to this new drive. Windows usually ask you to press any key a few seconds before the ChkDsk process begins, or you can also go for Ctrl+C. This works for Windows 10/11; usually, a fixing stage error can also occur if your computer cannot update to the latest version of Windows.
You can also get professional help if none of the above-mentioned fixes helps in resolving the Fixing C Stage 1 issue.
Also Read: Windows 11 won’t sleep: 10 Fixes


