A green screen is the very basic of all video effects. It allows for a lot of other complex video effects to happen, which lets directors create the breathtaking action movies that we see.
That’s not to say that green screens can’t be used in simpler scenarios as well. For something even as basic as swapping out the background in a video, you’d use a green screen.
Why a Green screen?
This is a question a lot of early editors ask. Why the colour green? Why not blue or red or any other colour for that matter.
Well, the answer is simpler than you might think. Green doesn’t match with any natural skin tone or hair colour. This means that no part of the actor gets cut out using the chroma key. When a green prop or costume is essential, a blue screen is used instead.
Also read: How to find presets for Adobe Premiere Pro
How to work with Green Screens in Premiere Pro?
Working with a green screen in Adobe Premiere Pro is super simple.
Step 1: Drop the clip onto a timeline or create one.
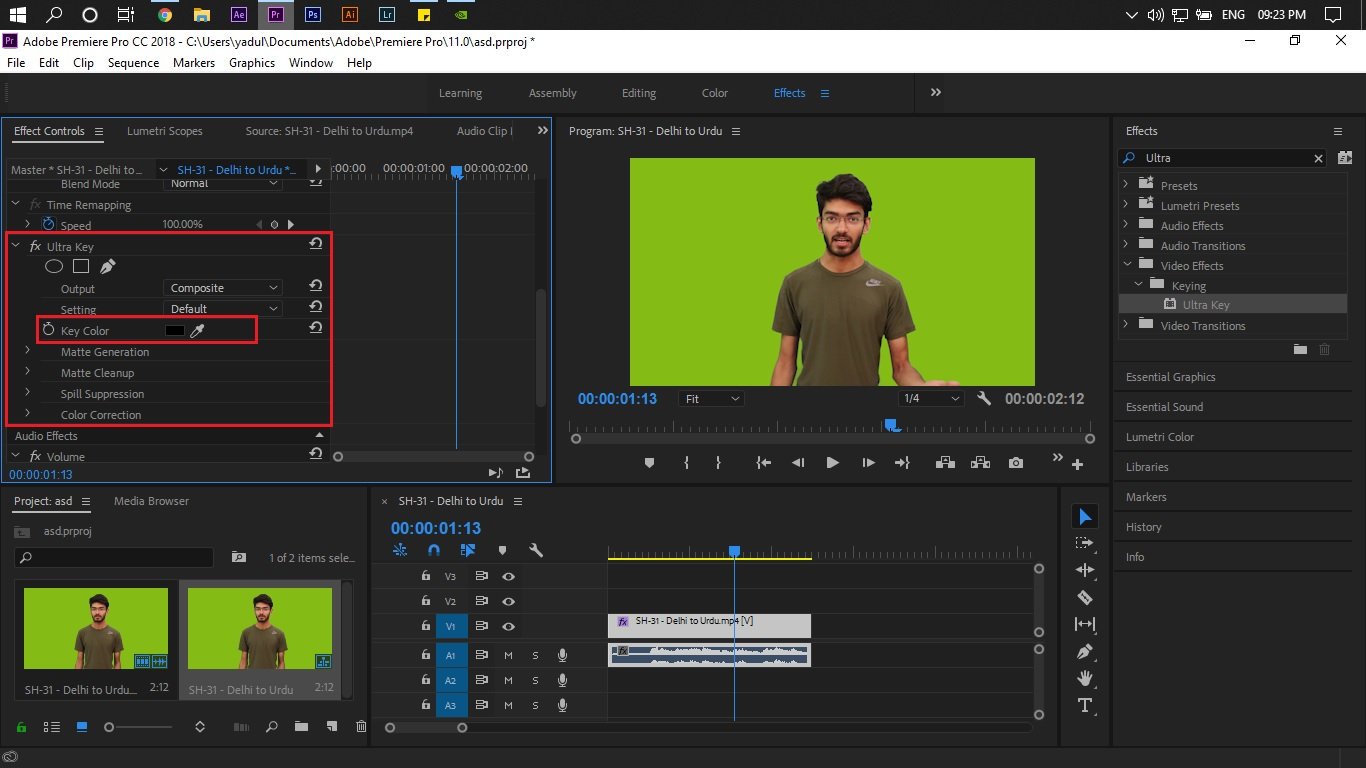
Step 2: Go to the effects panel and search for ‘Ultra Key’. Drag and drop the effect onto your clip.

Step 3: Go to the ‘Effect Controls’ panel and scroll down to the Ultra Key controls. Click on the ‘Key Color’ and pick a spot of colour on the screen.

Step 4: You’ll notice that the colour you selected has gone black. This essentially means that the colour has been hidden or masked out. Any grey patches you might see is the colour still showing through and will need some more touches.

Step 5: As a final touch, try changing the setting to ‘Aggressive’ to mask out any spots that might be left. YOu can also go ahead and play around with the ‘Matt Generation’ Settings to get more of the desired effect.

That’s how you replace a green screen in Premiere Pro. Keep in mind though that any reflections, shadows or see-throughs will be a problem when keying so be sure to keep them in mind when shooting.
Also read: Cinematography 101: Introduction to colour grading in Premiere Pro


