The Advanced Configuration and Power Interface (ACPI) is a crucial component of a computer’s BIOS(Basic Input/Output System). It plays a vital role in managing power settings and device configurations, ensuring the smooth operation of the hardware and software.
In this article, we have discussed the causes of the ACPI BIOS error and a few ways to help you fix the error.
What is ACPI?
The Advanced Configuration and Power Interface (ACPI) is an open standard developed by Intel, outlining the guidelines for the interaction between operating systems and computer hardware. It encompasses specifications for power management, as well as the communication protocols between computers and peripheral devices such as monitors or printers.
Also read: How to access BIOS in Windows 11?
What are the causes of the ACPI BIOS error?
Below we have mentioned a few possible causes that might be causing the ACPI BIOS error.
- Outdated system drivers.
- Device drivers are not configured correctly.
- Drivers conflict after a new hardware installation.
- Changes in software damaged the Windows Registry database.
- System files are damaged by Malware.
- The HDD is damaged.
- RAM is not functioning correctly.
When might the ACPI BIOS error occur?
ACPI BIOS error might occur during the following processes.
- During the Windows installation process.
- While resuming your PC after a long hibernation.
- While booting your PC.
The ACPI BIOS error can occur on any Windows device, regardless of the brand. However, certain manufacturers such as Asus, Dell, HP, Lenovo, Sony and Acer have experienced this issue more frequently than others.
How to fix the issue?
If you are encountering the ACPI BIOS error, then we have explained a few ways to help you fix the issue.
Update BIOS
The BIOS, which is the first software that launches when you power on your PC is responsible for initialising various components such as the hard drive and memory. It then transfers control to the operating system. One of the reasons why users encounter the ACPI BIOS error is due to an outdated BIOS.
- Check your BIOS version.
- Visit your product manufacturer’s website and download the latest version.
- Extract the software to a USB drive.
- Restart the device and enter the BIOS key for your PC.
The instructions to update a BIOS differs from brand to brand, so you can visit your product’s support page for the BIOS update instructions and follow them to update it correctly.
Update the BIOS driver
The ACPI BIOS error frequently occurs when the BIOS driver is not up to date. Drivers play a crucial role in the proper functioning of computers and if they are not maintained properly, they can cause system crashes.
- Visit your product manufacturer’s website and download the latest drivers.
- Install the drivers properly by following the instructions on your product manufacturer’s website.
Uninstall the Microsoft ACPI-Compliant driver
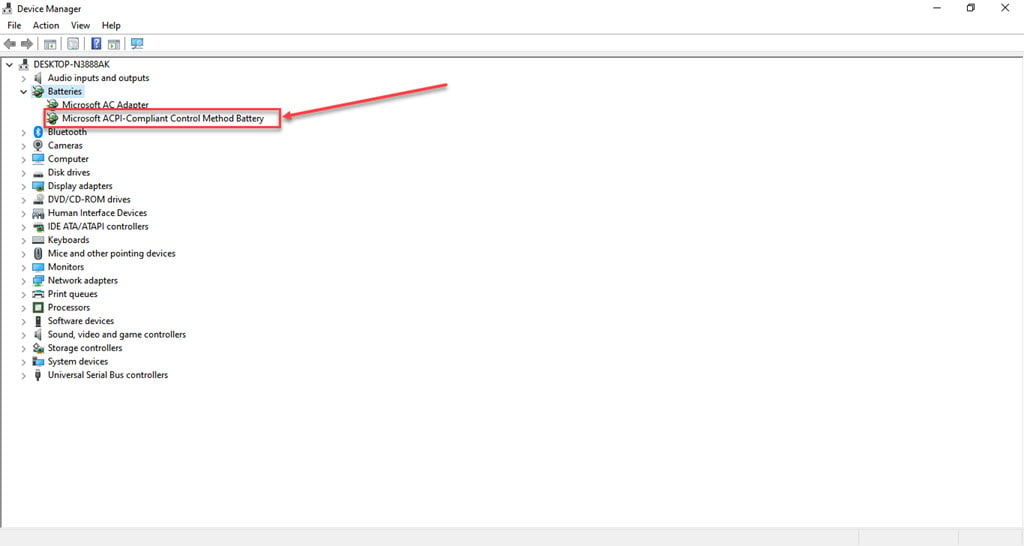
Some users have resolved this issue by uninstalling the Microsoft ACPI-Compliant Control driver. To uninstall the ACPI Compliant Control driver follow the steps below.
Step 1: Press the Window+X keys and in the drop-down menu click on the Device Manager option.

Step 2: In the device manager, expand the Batteries option and then right-click on the Microsoft ACPI-Compliant Control Method Battery.

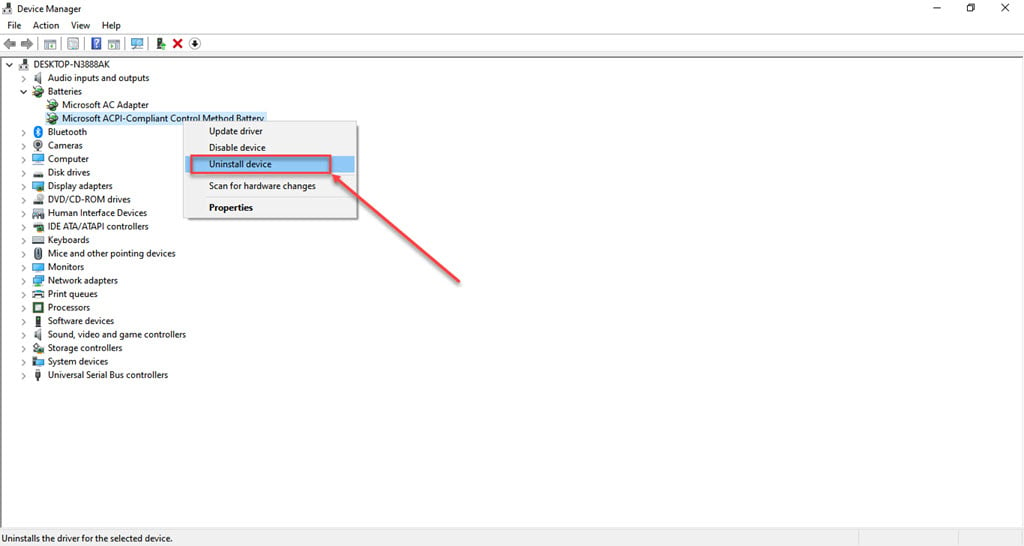
Step 3: In the drop-down menu, click on the Uninstall device.

Step 4: After the uninstallation process, click on the Scan for hardware changes button and wait. Let Windows install the new drivers automatically and then restart your PC.

Set ACPI mode to S1
Some users that were facing the ACPI BIOS error have fixed it by setting the ACPI mode to S1. To do that follow the steps below.
- Restart your PC and press the BIOS key, the keys are usually given on the screen.
- Navigate to the BIOS Power Settings section by using the arrow keys, in some devices, you may find the same option with other names like Advanced.
- Go to the Advanced Power Management option, which also might be shown as APM, Power Savings or other names on different devices.
- Use the arrow keys to select it and hit Enter button.
- Change the mode to S1.
- Save the changes and then exit the BIOS.
Disable AHCI mode
The Advanced Host Controller Interface (AHCI) is a specification that outlines the proper communication protocols between host controllers and storage devices like hard drives or SSDs. Disabling the ACHI from BIOS might fix the error. To disable ACHI from BIOS follow the steps below.
- Restart your PC and enter the BIOS.
- Locate the Storage options, the name different from brand to brand.
- Choose the IDE or RAID to replace the AHCI option.
- Save the changes and exit the BIOS.
Change the OS image ID
An OS image ID is an exclusive numerical identifier that distinguishes the specific version of an operating system you have installed. To change it follow the steps below.
- Restart your PC and enter the BIOS.
- Go to Advanced and then select the System Component.
- Go to OS image ID and set it to Windows.
- Save the changes and exit the BIOS.
Use the Startup Repair
Windows Startup Repair conducts a thorough examination of your computer for any detected issues and subsequently attempts to resolve them. To use the startup repair follow the steps below.
- Insert the Windows installation DVD or bootable USB into your PC.
- Restart your PC and click on Next, when the option is prompted.
- Select the Repair your computer option and then choose Troubleshoot.
- Click on the Advanced options.
- Then choose the Startup Repair option and then follow the on-screen instructions and complete the repair process.
Remove Overclock settings
If you have used any overclocking software then it might be a reason for this error to occur, removing the overclock settings might resolve the issue. To do that follow the steps below.
- Restart the device and enter the BIOS.
- Go to Overclocking section.
- Reset all settings to the default.
- Save the changes and exit the BIOS.
Use the System Restore
If none of the above methods work for you then you can try doing a system restore. This process will restore your system to its default settings by undoing any changes made in the device manager and all other system programs. Make sure to take a data backup before performing a system restore. To restore your PC follow the steps below.
Step 1: Type System Restore in the Windows search and click on the Recovery option.

Step 2: In the new window, click on Open System Restore.

Step 3: In the System Restore window, click on the Next button.

Step 4: Select the store point from the options and click on the Next button.

Step 5: Click on the Finish button.

Let the system restore process complete.


