Apple’s Airpods are one of the most innovative and creative wireless earbuds that not also offer control at your fingertips.
Airpods offer customisation like no other wireless earphones. Whether it is automatic ear detection or double-tap feature, you can personalise each of the controls according to your liking.
Here we guide you through each of Apple’s Airpods functionality including changing the name of your Airpods, what happens when you double-tap, how to toggle automatic ear detection and its microphone usage.
How to change the name of your AirPods?
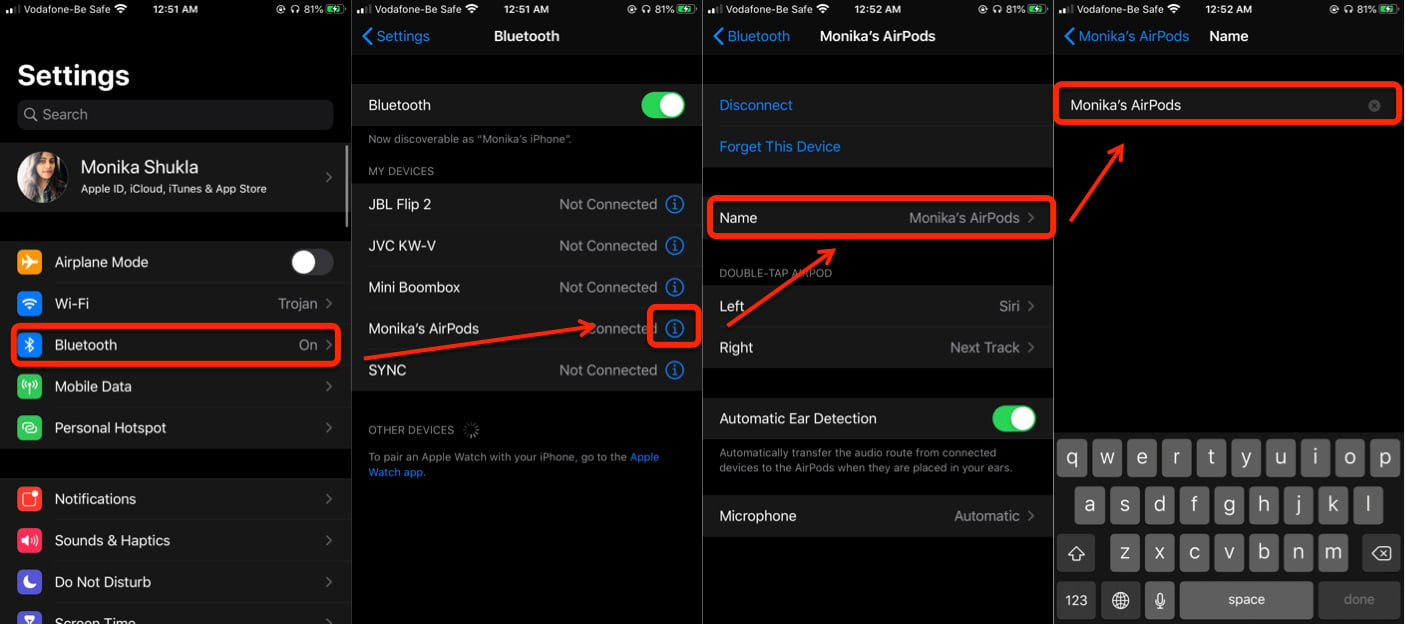
You can change the name of your pods and keep it whatever you’d like to call them. To do so, follow the steps below.
- Open Settings app on your iOS device.
- Tap on Bluetooth option and turn it on by sliding the toggle towards the right. Make sure your Airpods are out of their case and connected automatically. If not, look for your Airpods in the list and tap. This will connect them to the device in your hand.
- Tap on the i icon located on the right-hand side of your Airpods name.
- Tap on Name.
- Clear the old name and enter the name you’d like to keep.

Also read: How to use Find My AirPods?
How to personalise double-tap function on your AirPods?
Apple’s Airpods double-tap function is one of the best features it offers. Thanks to its built-in accelerometer, it literally gives control to your fingertips, which means you don’t need to take out your phone to perform certain actions while listening to your music. This gives you a truly controlled, uninterrupted experience.
Each earbud offers double-tap feature and you can personalise both-left and right, as per your liking. To customise this feature, follow the instructions below.

- Open the Settings app on your iOS device.
- Select Bluetooth and find your Airpods from the list.
- Tap on i button on the right side of your Airpods name.
- Under Double-Tap Airpod, both the left and right earbud options will appear. Choose the Airpod you would like to personalise first.
- You can customise the following five aspects on each of the earbuds. Siri, Play/Pause, Next Track, Previous Track, Off, and you can choose and tap anyone most useful function for you
Also read: Apple AirPods (2nd Gen) vs Samsung Galaxy Buds+
How to enable/disable Automatic Ear Detection feature on your AirPods?
Automatic ear detection is one of the most amazing features Apple’s Airpods has to offer. This feature means if you take off your Airpods or one of the Airpods from your ears, it will automatically pause the music you’re listening to and when you put them back on, it will automatically resume.
To enable or disable this feature, follow the steps below.
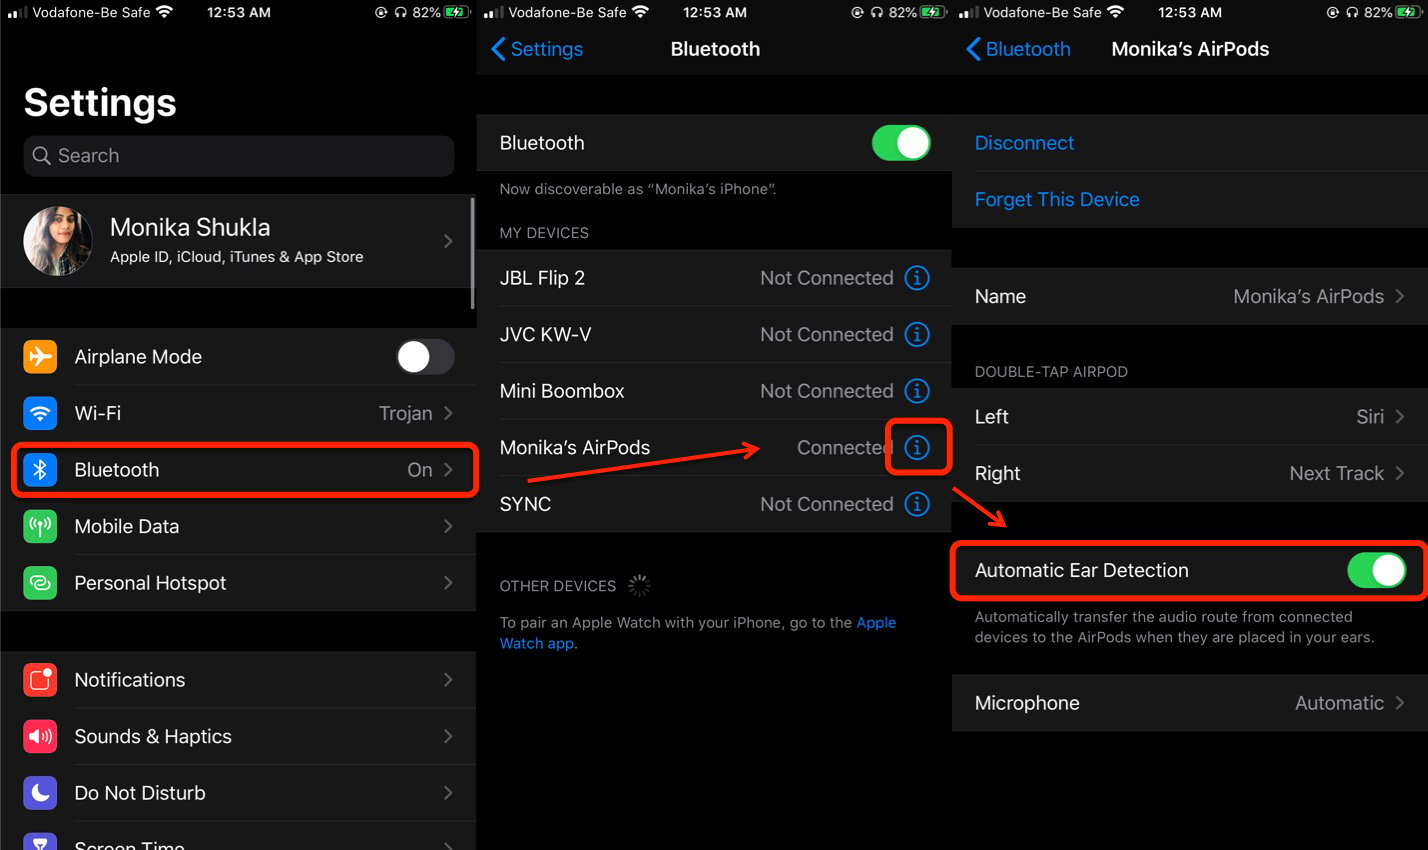
- Go to Settings app on your iOS device,
- Select Bluetooth and look for your Airpods.
- Tap the i button right next to your Airpods name.
- Scroll down to Automatic Ear Detection option and slide the toggle to your right to enable the option. To disable the option, slide the toggle button to your left.

Also read: AirPods Pro vs AirPods 2: Which one should you buy?
How to customise your AirPods microphone?
Apple has installed a microphone in each of the Airpods so that you can take phone calls or talk to Siri. When you first connect your Airpods, the microphone is by default set to Automatic, which means either of your earbuds can act as a microphone. If you’re using only left earbud then left microphone is on and vice-versa.
However, you can also set this to Always Left or Always Right as you fancy by personalising it in your settings app. Follow the instruction below to do so.

- Open Settings app on your iOS device.
- Go to Bluetooth and find your Airpods in the listed devices.
- Tap on the i button next to your Airpods name.
- Scroll down and select the Microphone option.
- Now choose the option you’d like to set your Airpods microphone to from the following – Automatically Switch Airpods, Always Left Airpod, Always Right Airpod.
In case you choose Always Left or Always Right, the microphone will always be set to that particular Airpod and it will not switch even if you remove it from your ear and keep it in the case.
Also read: How to turn on Find My iPhone (iOS 13)?


