Dark mode has become increasingly popular among users as it offers a sleek and visually pleasing alternative to the traditional light interface. If you’re a Mac user and want to enable dark mode, you will be pleased to know that enabling dark mode on Mac is quick and easy.
In this article, we’ll walk you through the steps to activate dark mode on your Mac allowing you to enjoy a darker and more immersive user experience.
Remember, to activate dark mode, ensure your Mac is running macOS Mojave or later. The dark mode was introduced in macOS Mojave, so older operating system versions may not support this feature.
Turn on dark mode on Mac using the toolbar
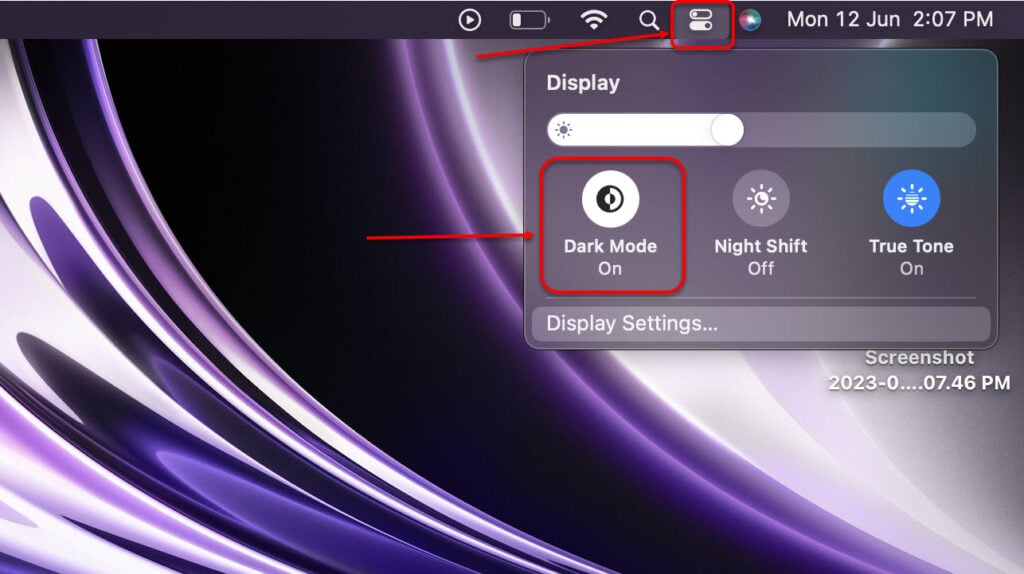
Click on the icon resembling two stacked slider buttons in your screen’s top-right corner to open the Control Center on your Mac. This icon is available only if you have updated your computer to macOS Big Sur.

Turn on dark mode on Mac using system settings
Here are the steps to turn on dark mode on Mac:
Step 1: Click on the Apple menu at the top-left corner of your screen. From the dropdown menu, select System Preferences.

Step 2: Then locate the Appearance section. Here, you’ll find two options: Light and Dark. To switch to Dark Mode, click on the Dark option.

If you don’t want the dark mode enabled all the time, you can also schedule it to turn on at a customised time by choosing the Auto option.
You can further customise your Mac’s appearance by choosing an accent colour. This colour will be used for buttons, checkboxes, and other interface elements. Select your preferred accent colour from the available options.
That’s it! You have successfully enabled the dark mode on Mac.
Also read: How to get dark mode on Snapchat?
Some additional tips
Now let us move to some additional tips to enhance your dark mode experience on Mac further.
Enable dark mode automatically at night
If you want to enable the dark mode automatically at night, follow the instructions given below:
Step 1: Click on the icon resembling two stacked slider buttons in your screen’s top-right corner to open the Control Center on your Mac. This icon is available only if you have updated your computer to macOS Big Sur.

Step 2: Click on Display, then Night Shift.

Step 3: Select the Schedule you want to set — a Custom schedule where you can select the From and To times or the Sunset to Sunrise option. Then click on Done. You can also set the temperature of the screen that’ll change according to the schedule.

Your Mac will enter Dark Mode according to the schedule you’ve set. You can alternatively also toggle the Night Shift using the shortcut in the toolbar’s stacked slider buttons.

Toggle between dark and light modes quickly on Mac
If you want to switch between the dark and light modes quickly, here’s what you have to do:

- Within the menu, locate and click on the Display option. You can click on the word Display itself or anywhere inside the box, avoiding the slider.
- In the Display settings, you will find the option to enable or disable Dark Mode. Simply click on the Dark Mode option to switch it on or off, according to your preference.

Also read: How to turn on the dark mode in Windows 10?
Frequently answered questions (FAQs)
Let us head to some FAQs on the topic:
Why is there no dark mode option on my Mac?
If you are not seeing the dark mode option on your Mac, you must update the macOS to at least macOS Mojave or later.
If you have already updated the macOS and still cannot see the dark mode option, there might be some bug. Usually, restarting the device fixes the issue. If not, then try to reinstall the macOS or contact Apple support.
Does Macbook have night mode?
Yes, MacBook has a night mode option. You can enable the night mode by heading to the Apple menu > Settings > Displays > Night Shift.
Also read: How to turn off dark mode on Google?


