Cinematic transitions are something that can make or break a video. The ability to slip in subtle transitions in between clips that are so seamless that no one even notices them is going to be by far the best tool in your video editing arsenal.
A screen mask transition is an amazing way of blending in two clips together. This transition is essentially a clip revealing another clip underneath it. If done correctly, it’s going to look really cool and subtle.
You do however need to shoot your clips accordingly in advance for this. There has to be an object panning across your frame in the first clip that you can then mask and reveal the footage below. Here is how you can make a screen mask transition in Premiere Pro.
Also read: How to find presets for Adobe Premiere Pro
Making a Screen Mask Transition in Premiere Pro
Fire up Adobe Premiere Pro, load your clips in and let’s get started
Step 1; On your first clip, go to the first frame where the object that’s covering the frame starts revealing what comes after. Cut the clip at this point.

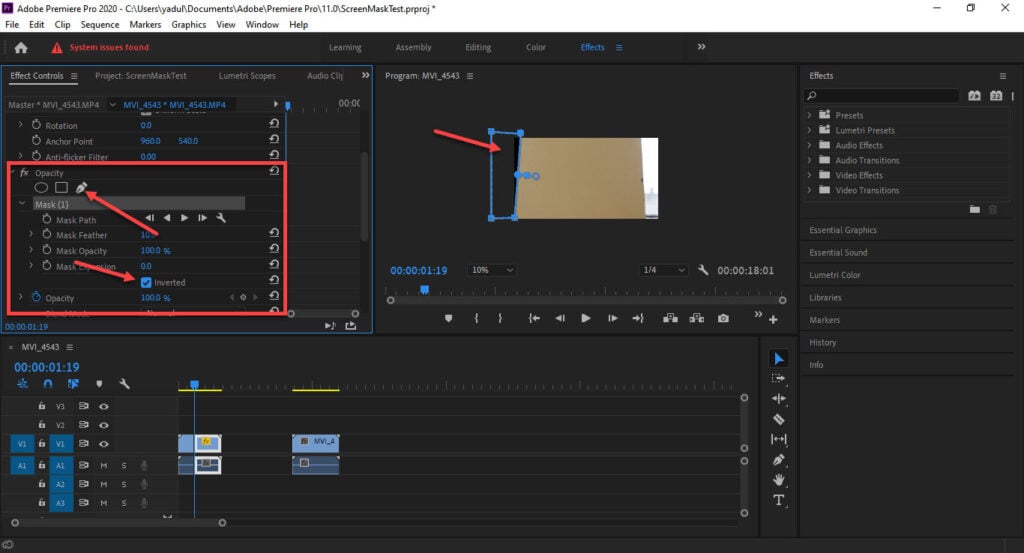
Step 2: Under the Effects Control panel, select the Opacity filter and select the Free Draw Bezier to create a mask. Make sure to check the inverted checkbox under Mask Expansion.

Step 3: Make sure you click the keyframe icon for all the properties under the mask. This is going to help us accurately track the mask while not leaving any harsh edges.

Step 4: Once you’re happy with the mask, click the Track selected mask one frame forward button in the Mask Path pane. Make sure your mask is selected.

Step 5: Adjust the mask accordingly to make sure it covers the entire frame from the revealing object. Don’t be afraid to add a little bit of feature or new points to keep the edges smooth,

Step 6: Repeat Steps 4 and 5 until the whole frame is blacked out.

Step 7: Place the clip you wish to reveal under the clip we just masked out and you’re good to go.

Also read: How to work with a green screen in Premiere?


