More software is implementing AI and generative AI capabilities to improve its functionality and user experience. Students and content writers are familiar with Chat GPT’s essay-writing capabilities.
Adobe Sensei, the back end of Adobe, already uses AI. But now software like Photoshop and Illustrator have added AI tools like generative fill, text identifier, and other useful features that can help designers streamline their workflow.
It used to take hours to remove the background from an image by manually selecting the subject and tweaking the edges until the designer was satisfied with the results. Now, you can achieve the same quality with the click of a button (with minor tweaks, of course; AI isn’t taking over humans just yet).
Here we’ve discussed how designers can use these seven new Illustrator features, some of which are AI-driven, to create concrete visuals from abstract ideas much faster.
If it’s your first time using Adobe’s AI features you will be prompted to agree with the terms and conditions of using Generative AI. Click Agree if you are comfortable with Adobe’s terms and conditions.

Also read: How to play NYT Connections? Tips and Tricks
Retype: Pick fonts from images
Retype is a Beta feature that you can use to identify the font from an image or outlined text and convert it into editable text. Here is how to use the tool:
- Step 1: Bring an image or outlined text to your canvas.
- Step 2: Select the image then go to Type > Retype > Match Font.
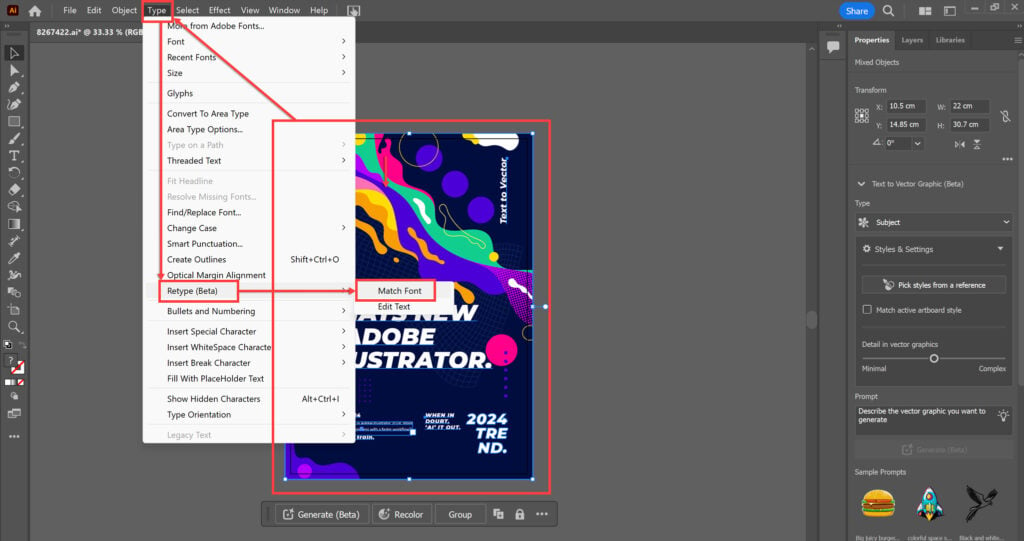
- Step 3: The largest word in the image or outlined text is automatically selected with a marquee.
- Step 4: Move the marquee to the font you want to receive suggestions for.
- Step 5: The retype panel will show up to 10 font suggestions that look similar to the font of the selected word.
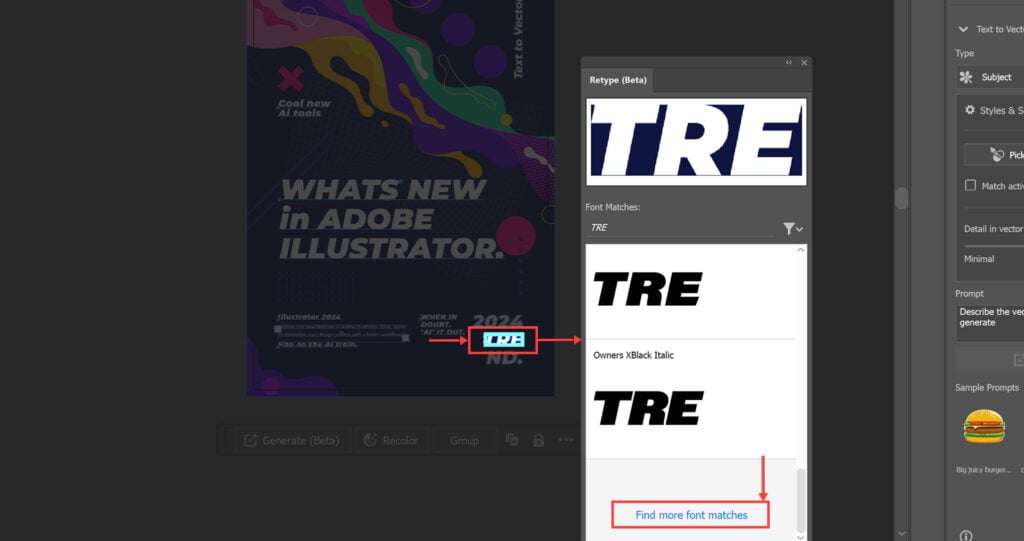
- Step 6: To find additional fonts, go to the bottom of the retype panel and select Find more font matches.
- Step 7: Select the font that best matches the text and click Activate if it is not already active.
- Step 8: To apply the fonts to the text, click on Edit text > Apply.
- Step 9: This will turn the image or outlined text into live, editable text.
- Step 10: Press the Esc key to close the retype panel.
Also read: What does NTY mean?
Generative Recolour: Use generative AI to recolour your artwork based on theme prompts
You created an intricate graphic and tediously coloured each section, and now you want to try out different variations. One way is to use the Recolour Artwork tool, but that means you have to manually select each colour and add another colour instead of it.
A quicker way to compare colour palettes is to use the generative recolour tool. Here’s how:
- Step 1: Duplicate your design and select it. This is so that you can compare the colour palettes and don’t lose the one you originally created.
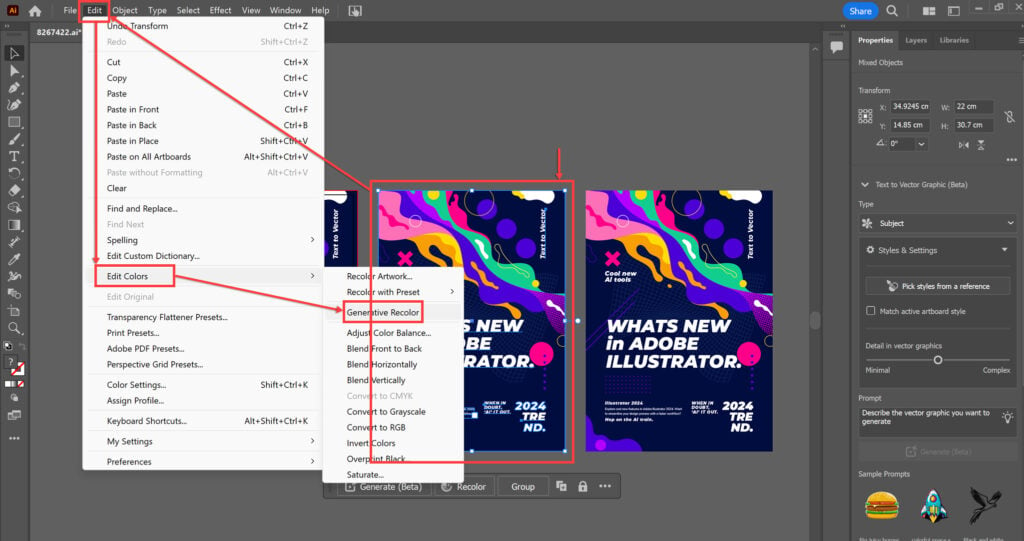
- Step 2: Go to Edit > Edit Colours > Generative Recolour
Step 3: In the window that opens up, type in a theme or mood or any prompt that will help generate a colour palette. You can also choose from the given themes.

- Step 4: Tap Generate.
- Step 5: Based on your prompt, you will see a few options for colour palette variations. Choose the one you like the most and tap it. This will be reflected in your selected artwork.

Pro Tip: Make at least 3 duplicates of your design with 3 colour palette variations and choose the most effective one.
Text to vector: Generate vector graphics based on text prompts
You can create vector graphics from scratch, or you can download and modify graphics from online libraries. But what if you could create unique vector-based editable graphics in a few easy steps?
- Step 1: Go to the Properties tab in your Workspace.
- Step 2: Scroll down till you find Prompt with a text box under the Text to Vector Graphic (Beta) dropdown dialogue box.
- Step 3: Type in your prompt. Use the sample prompts provided below as a guide to what language you should use and how detailed your prompt should be.
- Step 4: Adjust the various parameters like Subject, Styles and Settings.
- Step 5: Click Generate (Beta).
- Step 6: Select the option best suited for your design aesthetic to add it to your artboard.
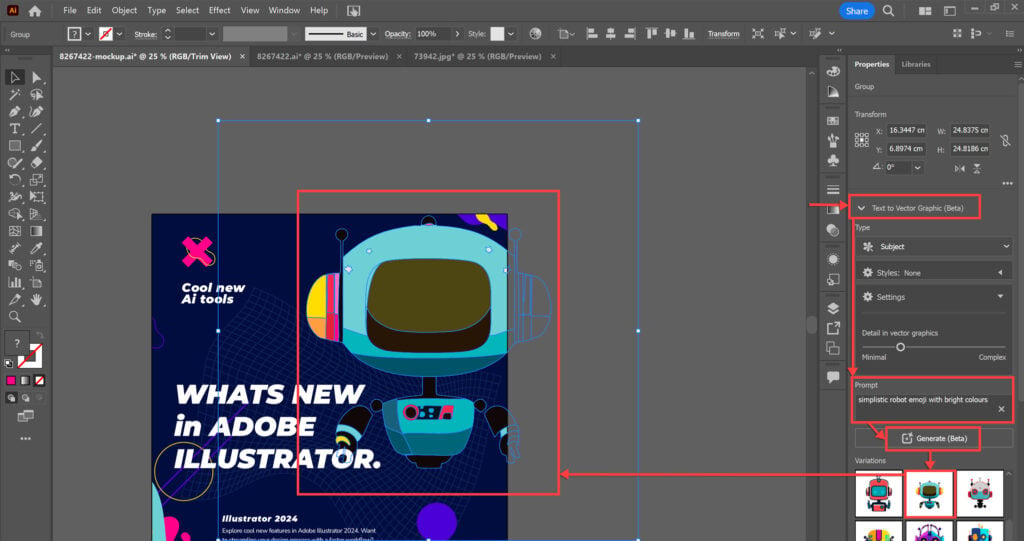
Pro tip: Select the generated graphic and use the recolour feature that appears in the floating dialogue box to match the colours with those of your design.
Also read: How to sign in to my old Hotmail account?
Mockups: Create realistic mockups of your design with AI
You can create realistic mockups using a raster image with your vector artwork. Here’s how:
Step 1: Open the image of the object you want to superimpose your artwork onto.

- Step 2: Group your artwork, place it over the image and select both image and artwork.
- Step 3: Go to Object > Mockup (Beta) > Make.
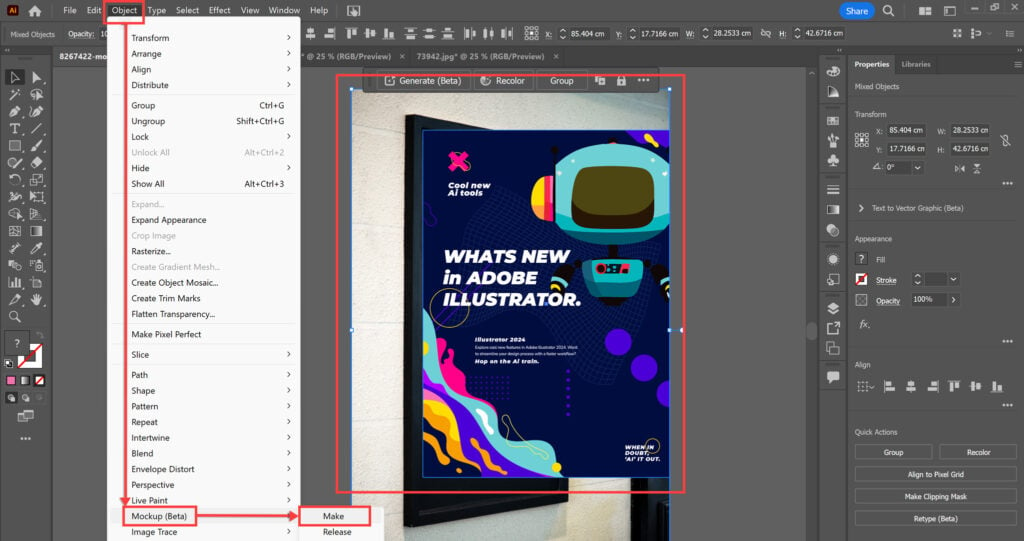
Note that if you haven’t used this feature before, it will prompt you to install additional modules to use the Mockup feature. Read the terms carefully and click Install.
Step 4: Adjust your artwork by selecting Edit contents in the property panel or go to Object > Mockup (beta) > Edit.
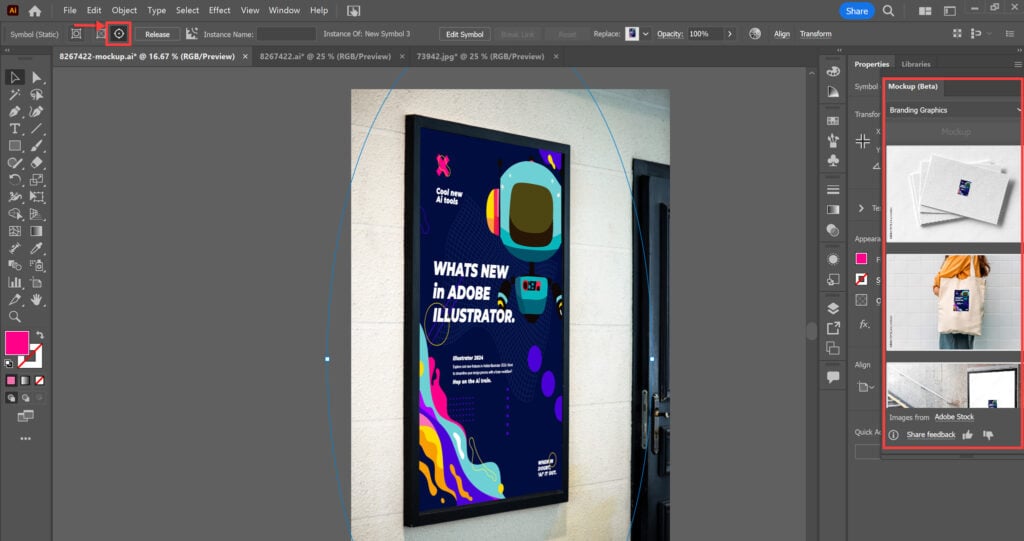
To undo this step, select the mockup image and vector and go to Objects > Mockup > Release.
If you want to use the mockup feature effectively there are a few things you should keep in mind:
- Your device must have a GPU if you want to use the Mockup tool.
- You can create a mockup only from vector artwork. Mockup does not support certain elements such as freeform gradients, meshes, graphs, or raster effects.
- Embed the files to create mockups. Linked files are not supported with this feature.
Intertwine objects: Create complex, overlapping vectors
You can make certain parts of a vector object go behind parts of another vector object, intertwining them. Follow these steps:
- Step 1: Select 2 or more vector objects from your artwork.
- Step 2: Go to Object > Intertwine > Make

- Step 3: With the cursor that appears, draw over the part/parts you want overlapping.
- Step 4: Select an area, right-click, and send it to the front, the back, forward, or backward, as per your requirement.
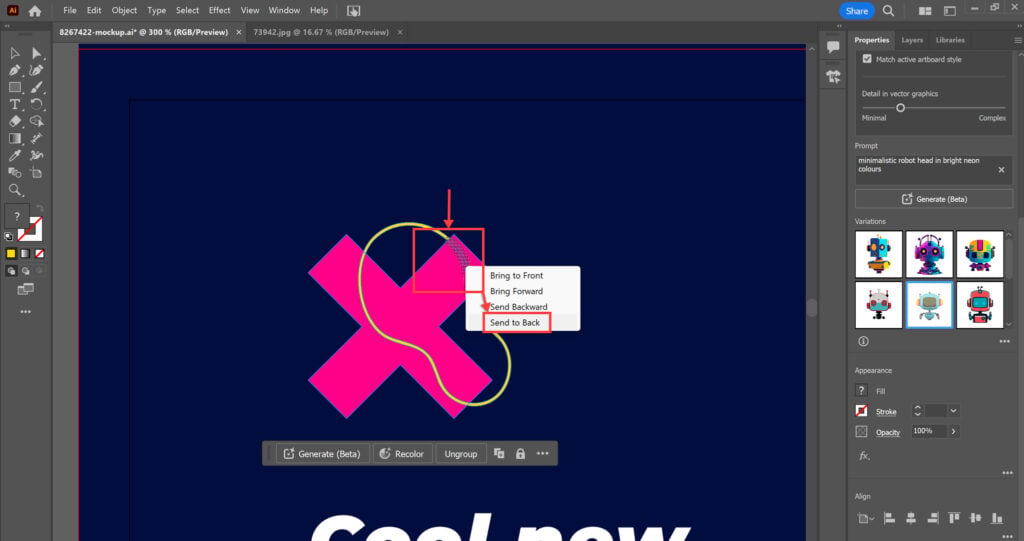
To undo this step, select the intertwined objects and go to Objects > Intertwine > Release.
Also read: How to select multiple files in Google Drive?
Enhanced Image trace: Convert raster images to vector graphics with more presets
Adobe has improved the image trace feature, adding more options and a preview mode to view the results before applying the function to your artwork or image.
The image trace feature autodetects a preset based on the image style. You can select a colour and exclude it or choose different colour modes for your vector output.
Read this for a detailed Step-by-Step of how to use Image Trace
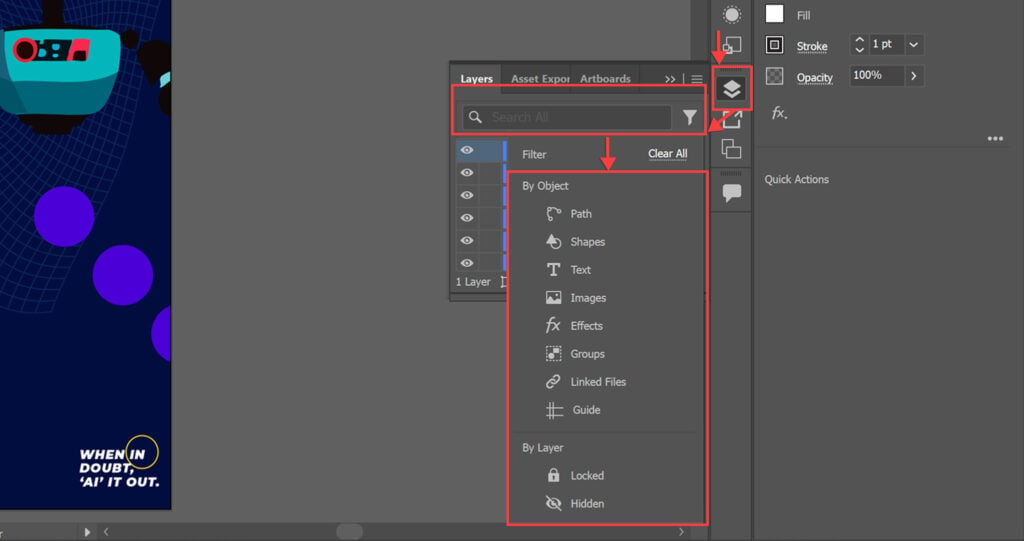
Search & Filter: Find a layer by typing its name or feature
You can now find layers by typing in their names in the search bar at the top. You can search for shapes, objects and effects to find a layer if you don’t recall the name or haven’t named all layers.
This feature is especially useful when you have multiple layers and grouped objects, which can make it difficult to see the layers just by scrolling.
Also read: How to add bullet points in Google Sheets?


