If you’ve ever designed just about anything on a computer, you know how big of a headache images are. There’s only so much you can do with them, and if you stretch them too big, the pixelation will kill your design.
Vector images, on the other hand, don’t have any such problems. They are scalable images that are made of values instead of pixels. Vector graphics convey colour using scalable colour polygons. The use of dynamic colour sections in a vector image lets it retain its perfect lines and colours regardless of the size.
In this article, we’re taking a look at how to convert images to vectors in Illustrator.
Also read: What is Vectorisation? How to vectorise an image in Photoshop?
Converting images to vectors
The first thing you need is the image itself. We’re using the PNG image of Lightning McQueen on a white background but feel free to use whatever image you like.
Step 1: Open the image in Illustrator and select it to activate image options. You should see them right under the toolbar.

Step 2: Illustrator uses a special tool called Image Trace. The tool comes with a bunch of presets that’ll vectorise your image to exactly your liking. To use a present, click the arrow next to the Image Trace button and select your preset.

Here’s a rundown of what each preset does.
- High/Low Fidelity Photo: These options produced a rather detailed vector image equivalent to your image. They’re ideal for photos or complex artworks.
- 3 Colour, 6 Colour, 16 Colours: As the name suggests, these convert your image to vector in three, six or 16 colours, respectively. Ideal for logos or flat artworks.
- Shades of Grey: Produces high-quality greyscale images.
- Black and White Logo: Produces a high-quality black and white image.
- Sketched Art, Silhouettes, Line Art, and Technical Drawing: Best for sketches as these presets output a predominantly line based image.
We’ll be using Low Fidelity Photo for this guide. Your image will take a second to vectorise.
Step 3: Now open up the Image Trace window by going to Window > Image Trace.

Step 4: Here, you can fine-tune your image by either dragging the Colour slider to the left to remove detail or to the right to add detail. You can use the Mode drop-down to switch between colour, grayscale, and black and white.

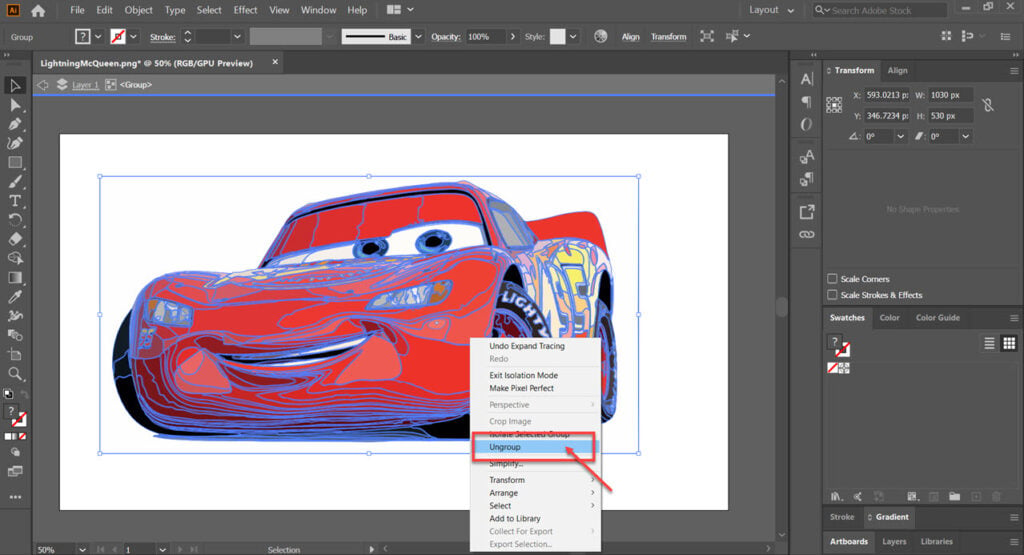
Step 5: Now, we need to ungroup the coloured shapes in the image. Select your image by double-clicking it and click on Expand at the top.

Step 6: Finally, right-click the image and click Ungroup. You’ll see the individual parts show up as layers in the Layers panel.

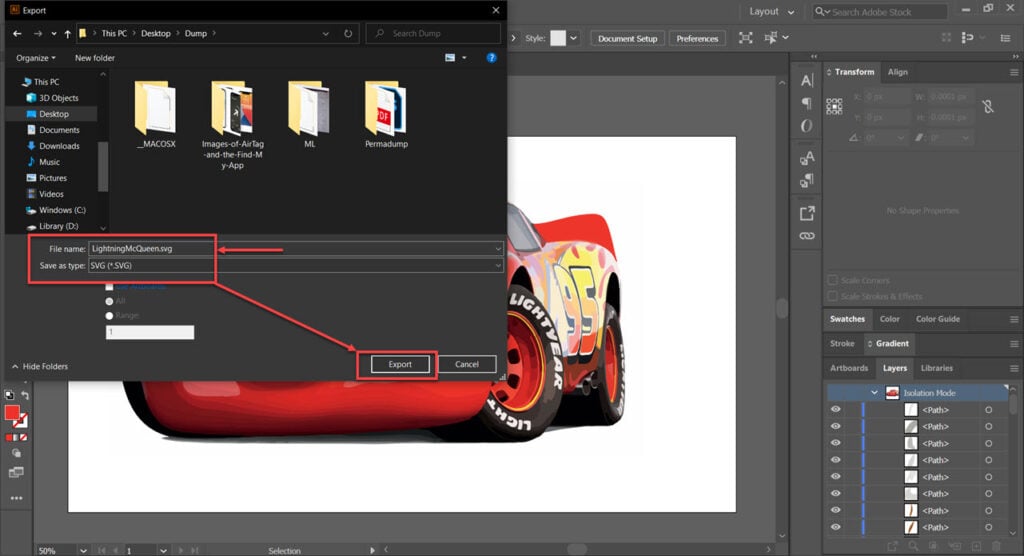
And that’s all you need to do to convert your image to a vector. You now have free range to edit the image in any way, shape or form you like. You can export or save your images as a vector by clicking on File > Export > Export As.
Make sure you select the file type as SVG before saving the file.

Also read: Top 7 Procreate alternatives for Windows


