Medical ID on iOS compiles critical medical information entered by a user and presents it to first responders on your Lock screen without requiring a passcode in case of an emergency. This feature can provide information about allergies, existing medical conditions and details about emergency contacts.
In this guide, we have listed two methods with which you can set up Medical ID on your iOS device alongwith additional steps, which will help you edit essential information at a later date or add new emergency contacts.
Also read: 14 new things you should check out in iOS 14
Method 1: From Health App
Open the Health app on your iPhone and follow the steps mentioned below.

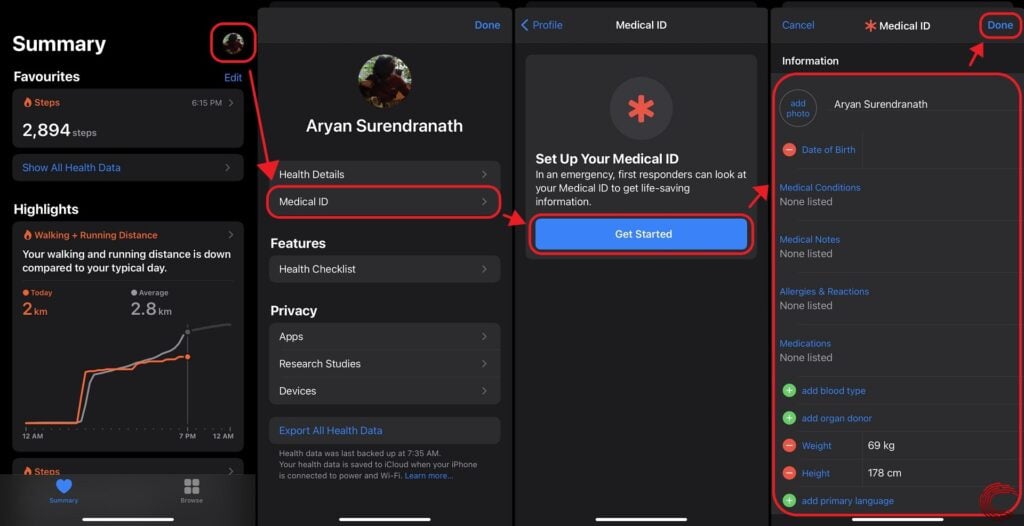
- Tap on your profile picture in the top-right corner.
- Tap on Medical ID.
- Tap on Get Started.
- Tap Done in the top-right corner after entering essential data, which includes any medical conditions, allergies, medications required, blood type, weight, height, primary language, among other things.
To make Medical ID available on iPhone’s Lock screen, turn on Show When Locked. In case of an emergency, this will allow first responders to view your information.
If residing in the United States, Apple offers an additional feature where your Medical ID can be shared with emergency responders by activating Share During Emergency Call. This feature automatically shares information when you call or send a text to emergency services.
Also read: 5 things to do if your Apple Pencil isn’t working
Method 2: From Settings
Open your iPhone’s Settings and follow the steps mentioned below.

- Scroll down to Health.
- Under Medical Details tap on Medical ID.
- Tap on Create Medical ID.
- Enter essential information which includes any medical conditions, allergies, medications required, blood type, weight, height, primary language, among other things, and tap on Next.
- Tap on Done.
Also read: How to check data usage on your iPhone and iPad?
How to make changes to Medical ID?
If you want to make changes to your Medical ID and edit some information from either the Health app or device Settings, follow the specific guides below.
Method 1: From Health app
Open the Health app and follow the steps mentioned below.

- Tap on your profile picture in the top-right corner.
- Tap on Medical ID.
- Tap on Edit.
- Tap Done in the top-right corner after making the required changes.
Method 2: From Settings
Open Settings on your iPhone and follow the steps mentioned below.

- Scroll down to Health.
- Under Medical Details, tap on Medical ID.
- Tap on Edit and make the required changes.
- Tap on Done.
Also read: How to remove or reset Screen Time Passcode on iPhone and Mac?
How to add Emergency Contacts to Medical ID?
To add emergency contacts, begin editing your Medical ID and follow the steps listed below:

- Tap Edit and scroll to Emergency Contacts.
- Tap the plus button next to add emergency contact.
- Choose a contact and add their relationship.
- Tap Done.
You can remove an Emergency Contact by, tap the minus button next to their name and selecting Delete.
Also read: How to manage subscriptions on the iPhone?
Where to find Medical ID?
If you aren’t able to find your Medical ID, follow the separate guides below for newer and older models of iPhone.
iPhone X and later
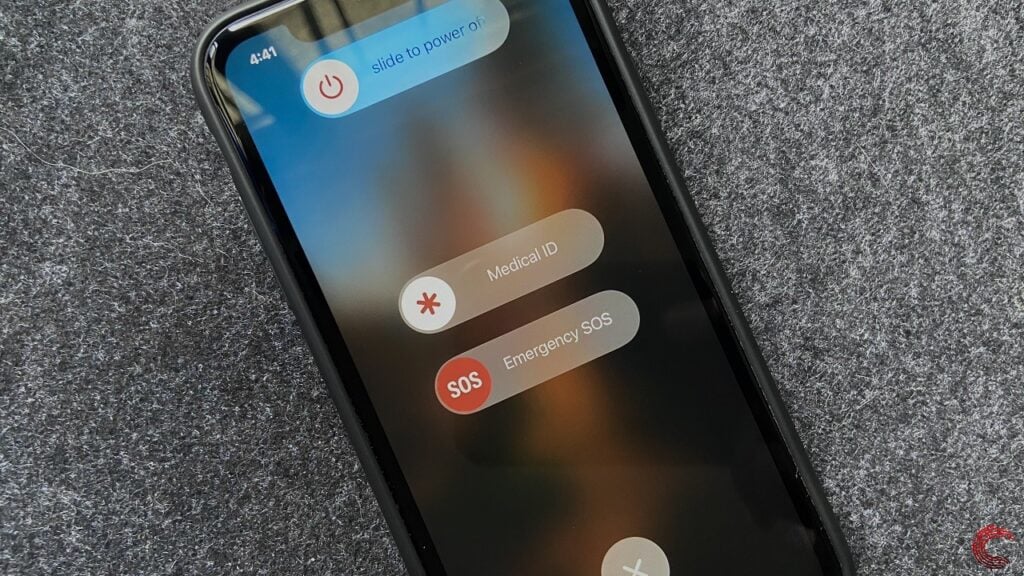
If you’ve a newer iPhone ‘with a notch’, follow the steps below.

Press and hold the Side Button along with either volume button. Once the Power menu with sliders appears, drag the slider for Medical ID.
Other models
Wake iPhone with Side/Top Button and in the passcode entry section tap on Emergency and then Medical ID.
Also read: iPhone XR in 2020: The cheapest iPhone to consider?


