If you use a USB drive to store or transfer files, you must know how to eject it properly from your Mac. Ejecting the USB drive safely is not just a matter of convenience but also a way to prevent data loss or corruption. Usually, people remove the USB from the port without paying much attention to data safety.
In this article, we’ll explain why we need to eject USB drives safely and how to do it differently.
You can eject a USB drive safely from your Mac in various ways. Here we’ve discussed four of them:
Also read: How to copy and paste on a Mac?
Using the Finder

Launch Finder, and in the sidebar, spot the eject icon adjacent to your USB drive’s name. If the eject button doesn’t seem to work, you can right-click in the Finder and then click on Eject.
Alternatively, right-click on the drive icon residing on your desktop and select Eject from the context menu.

Using the keyboard shortcut
Hold down the Command key and press the Eject button. This keyboard manoeuvre efficiently ejects the currently selected drive or, if none is chosen, the most recently accessed one.
Also read: How to connect AirPods to a laptop?
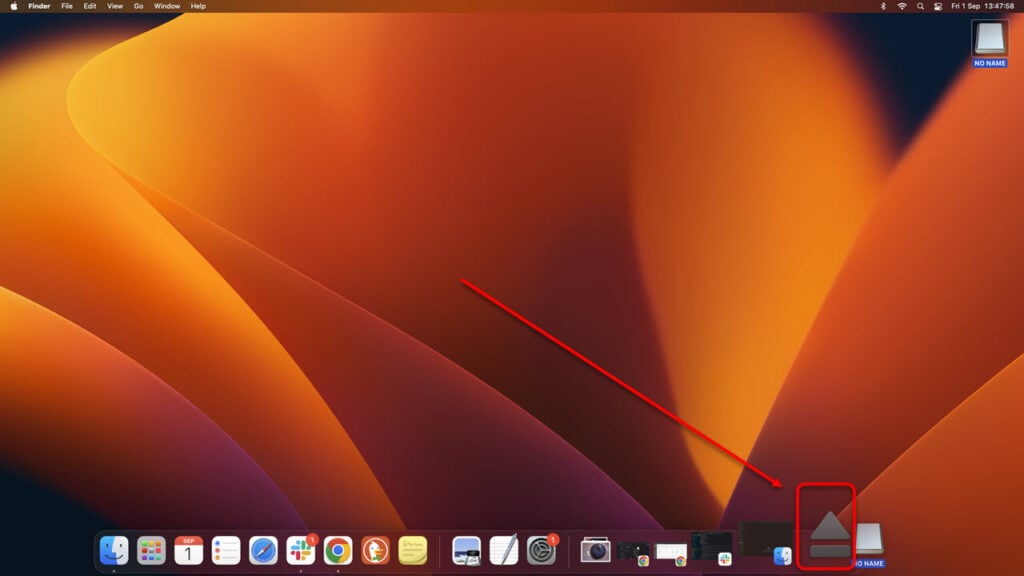
Using the Bin

You can use the Bin to eject a USB drive by dragging and dropping the drive icon to the Bin on your dock. The Bin will change into an eject icon when you do this.
Using Terminal

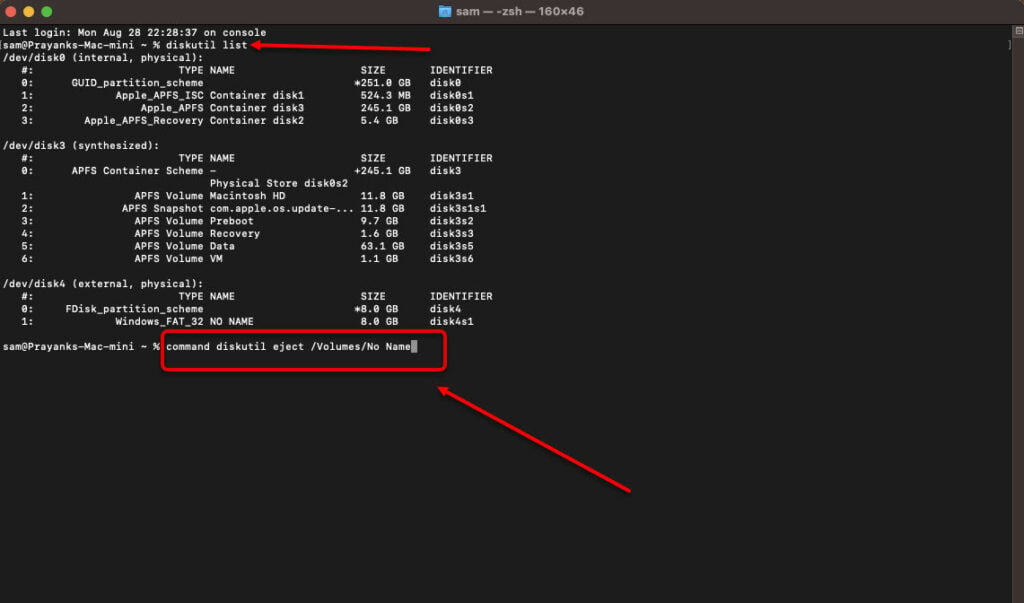
For those favouring a more technical approach, open Terminal and execute: command diskutil eject /Volumes/USB, replacing ‘USB’ with your drive’s name. Alternatively, employ: diskutil list to view a comprehensive list of all connected drives on your Mac, along with their corresponding names.
As you can see from the screenshot above, first, we have run the diskutil list and then at the end, we employed command diskutil eject /Volumes/USB command. The drive’s name is ‘No name’ which we have substituted in place of USB in the command.
Also read: How to eject a USB from Chromebook?
Why do you need to eject a USB drive safely?
A USB drive is a handy, plug-and-play storage device for your Mac, but pulling it out without a second thought isn’t a wise move. Here’s why:
- Data loss: Pulling the plug while your USB drive is in the middle of a data transfer or editing session can spell disaster. It’s a surefire way to lose files or corrupt data.
- Data corruption: Skipping the proper ejection procedure might harm the drive’s file system and data structure. The result? Files that might as well be written in an alien language rendering them inaccessible.
- Drive damage: Prematurely removing the USB drive could also inflict physical harm, damaging connectors or the circuit board. This, in turn, can hamper the drive’s longevity and performance.
To avoid these pitfalls, make it a habit to eject your USB drive from your Mac safely. Safely ejecting tells your computer to wrap up any ongoing tasks with the drive, ensuring data integrity and your drive’s well-being.
Tips for ejecting a USB safely from your Mac
When it comes to ensuring a secure USB drive ejection from your Mac, here are some valuable insights to keep in mind:
- Before ejecting the USB drive, it’s crucial to ensure that no applications currently use files from it. You can easily verify this by scanning for a small dot beneath the application icons in your dock or employing the Activity Monitor to identify any active processes linked to the drive.
- Don’t forget to confirm that no files are being copied to or from the USB drive during the ejection process. A glance at the Finder window or the drive icon on your desktop should reveal ongoing file operations via a progress bar.
- After initiating the ejection process, exercise a bit of patience. Wait a few seconds before physically removing the USB drive from your Mac. This short waiting period lets your Mac wrap up any background tasks associated with the drive.
- Should you encounter difficulties ejecting a USB drive, don’t fret. Consider trying an alternative method or restarting your Mac. Occasionally, a USB drive may become locked or ensnared in a glitch, necessitating a different approach to disengage it.
Ejecting a USB drive safely is a way to protect your data and device. You can follow any of the four methods listed above to do this.
Also read: How to delete downloads on your MacBook?


