Whether you use a computer for work, studies, or just love technology, accessing your files and data reliably is important. But sometimes, you run into unexpected problems, like frustrating error messages. The disk you attached was not readable by this computer. This error message can be problematic because it stops you from accessing your files on your external hard drive or USB device.
This article discusses the cases of the disk you attached was not readable by this computer issue and a few ways to fix the issue.
Causes of Mac not reading the drive
Below, we have discussed the reasons that might be causing the disk you attached to be not readable by this computer issue.
- Disk failure.
- Malware attack.
- Issues with the file system.
- Hardware or connection problem.
Also read: What is the folder with a question mark on Mac?
How to fix the issue?
We have explained a few methods below that might help you fix the disk you attached was not readable by this computer issue.
Make sure the drive is not faulty
To determine if the issue is with the drive you’re plugging in, unplug the problematic drive and plug in a different external drive, USB, or SD card. If the new one works, the problem likely lies with the first drive. If it still doesn’t work, you might need to check for hardware problems or other Mac-related issues.
Another thing you can try is connecting the troublesome drive to a different Mac to see if it functions properly there.
Verify if the disk is encrypted
Consider whether it’s encrypted when you suspect the disk is causing the issue. Encryption is like a lock that keeps your data safe. If it’s encrypted, you’ll need to unlock it before using it.
Check the file system
Check if your external hard drive, SD card, USB flash drive, or other devices use the FAT32 file system. If they’re formatted as NTFS, that’s likely what’s causing the disk you attached to be not readable by this computer issue. To fix it, try converting the NTFS format of your hard drive to FAT32.
To change the drive format, you have to format the drive, and to do that, follow the steps below.
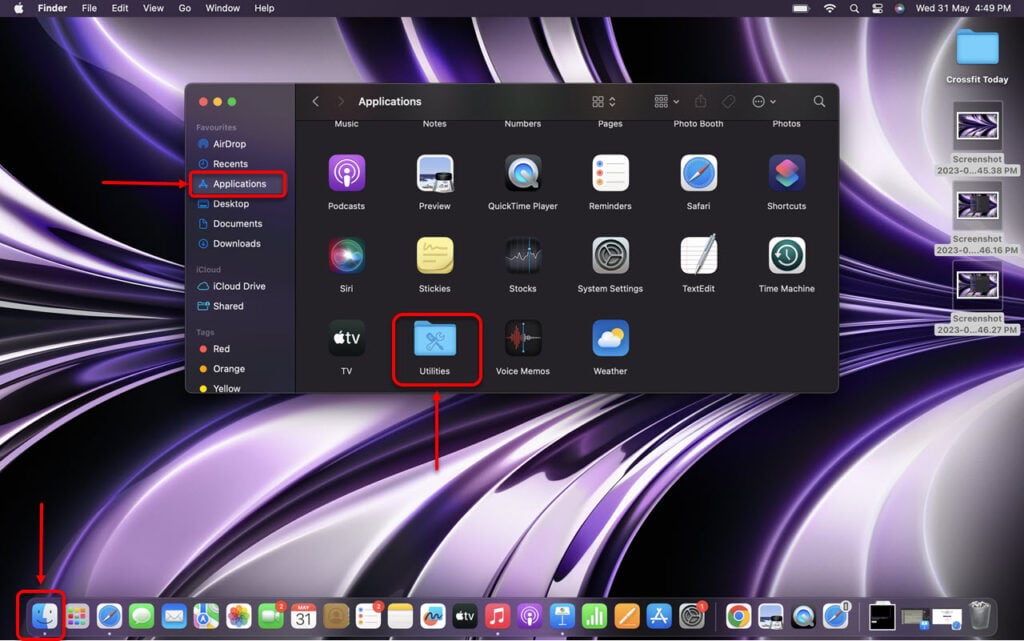
Step 1. Connect the drive to your Mac and open the Finder, then click on Applications and then click on Utilities.

Step 2. In utilities, double-click on Disk Utility.

Step 3. Select your USB flash drive from the sidebar and then click on Erase.
Step 4. Choose the format as MS-DOS (FAT), and for Scheme, choose Master Boot Record and then click the Erase button.
Also read: How to delete screenshots on Mac?
Repair the drive
Mac comes with a built-in tool called First Aid that can help fix issues with your disk. It’s a safe and easy process; you can use it whenever your disk isn’t working properly. To use the first aid to repair the drive, follow the steps below.
Step 1: Connect the drive to your Mac and open the Finder, then click on Applications and then click on Utilities.

Step 2. In utilities, double-click on Disk Utility.

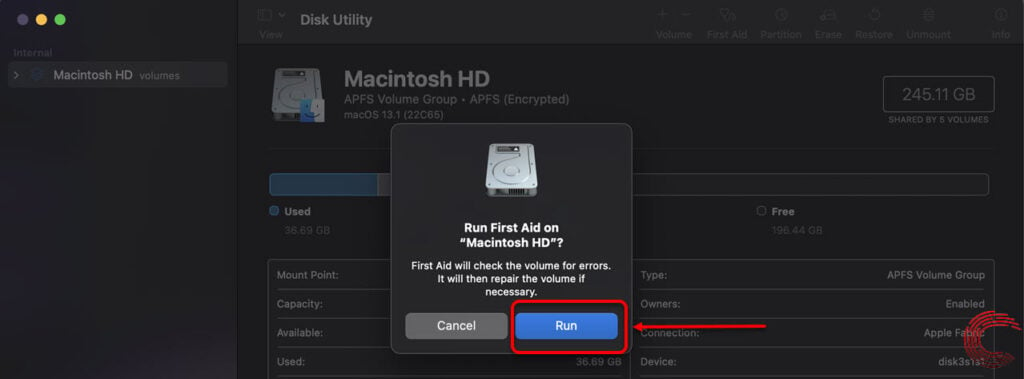
Step 3: Select the drive from the left pane and then click on First Aid.

Step 4: Click on the Run button to repair the disk.

Also read: How to eject a USB from Mac?


