Windows devices, especially those that run on battery power, conserve power in a lot of different ways to ensure that the device’s battery lasts as long as it can. Part of this power management is controlling parasitic energy loss from any peripherals that might be connected to your computer.
In this article, we’re talking about USB power management in Windows 11 and explaining how it can help your laptop run longer on battery power.
What is USB Power Management?
Any USB peripherals connected to your computer that don’t use an external power source more often than not draw the power required to function from the USB ports on your PC.
If you’re running on battery power, this can draw more power from your battery, causing it to drain faster.
Windows 11 has a setting that can stop this power loss by disabling USB ports when the device connected to them is idle. This can drop power loss to almost negligible giving you better battery life in the process. The setting is called USB Selective Suspend.
Also read: Windows 11 lid controls explained
How to enable USB Selective Suspend setting?
There are three ways you can enable this setting on your Windows 11 device.
Let’s take a look at all three methods.
Using Power Options
You can use Windows 11 power options to control this setting. Here’s how.
Step 1: Head over to Windows power options. The fastest way of doing so is using the Run prompt. Press Windows key + R and type control.exe powercfg.cpl,,3 and hit enter.

Step 2: Scroll down to find USB Settings and expand it, followed by the USB selective suspend setting.

Step 3: Here, you can enable or disable this setting for when your PC is either plugged in or charging.

Using the Device Manager
The Device Manager lets you control individual settings for all the different components on your PC, including the USB bus.
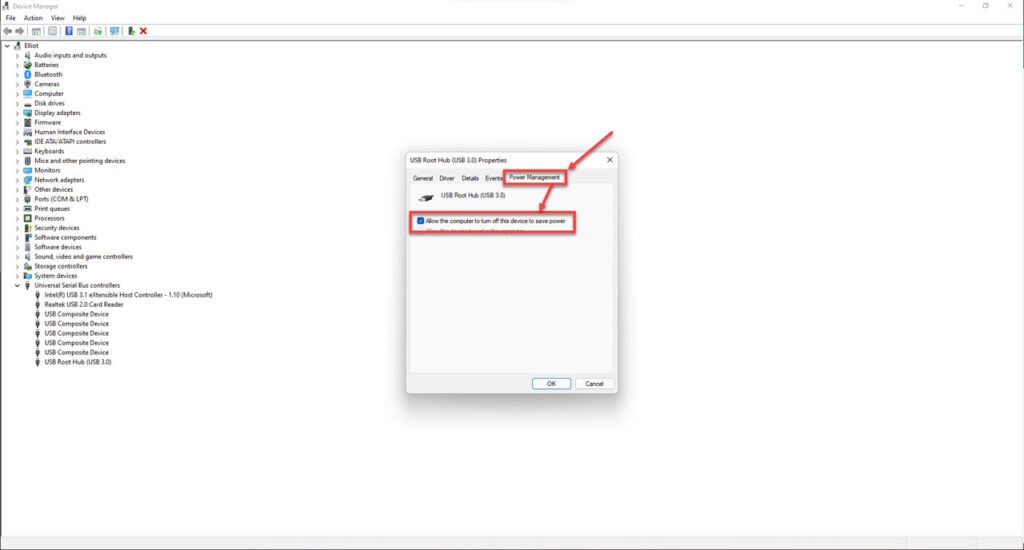
Step 1: Press the Windows Key + X to open the Quick Access menu and select Device Manager.

Step 2: Scroll down and expand the Universal Serial Bus controllers option and find the USB Root Hub (or Generic USB Hub) option. Right-click it and select properties.

Step 3: Under the Power Management tab, check the Allow this computer to turn off this device to save power option. If you want to disable the setting, just uncheck the box.
Using the Windows Command Prompt
Finally, you can also use the command prompt to control this setting.
Step 1: Press Windows Key + R to open the Run prompt. Type cmd and hit enter.

Step 2: Enter either of the following commands to enable or disable the setting depending on battery power or plugged in the state.
To enable on battery:
powercfg /SETDCVALUEINDEX SCHEME_CURRENT 2a737441-1930-4402-8d77-b2bebba308a3 48e6b7a6-50f5-4782-a5d4-53bb8f07e226 1.To disable on battery:
powercfg /SETDCVALUEINDEX SCHEME_CURRENT 2a737441-1930-4402-8d77-b2bebba308a3 48e6b7a6-50f5-4782-a5d4-53bb8f07e226 0.To enable when plugged in:
powercfg /SETACVALUEINDEX SCHEME_CURRENT 2a737441-1930-4402-8d77-b2bebba308a3 48e6b7a6-50f5-4782-a5d4-53bb8f07e226 1.To disable when plugged in:
powercfg /SETACVALUEINDEX SCHEME_CURRENT 2a737441-1930-4402-8d77-b2bebba308a3 48e6b7a6-50f5-4782-a5d4-53bb8f07e226 0.Also read: How to map a network drive in Windows 11?


