File Explorer is one of the most important UI elements in the Windows operating system. Some people have reported that their Windows Explorer Search is not working as intended.
This will make it difficult for day-to-day file searches that we do. The problem could be a result of many factors, and as such we will have to diagnose each probable cause.
In this article, we will explain the possible reasons why Windows Explorer Search is not working and provide fixes for the problem.
Why is Windows Explorer Search not working?
There are several reasons why the Windows Explorer Search is not working. Here are some of the most common ones:
- Corrupt or missing files
- Outdated or faulty drivers
- Incompatible settings
- Outdated Windows OS
- Malware infections
Also read: Why is the microphone not working in Windows 11? Quick Fix
How to fix Windows Explorer Search not working?
Now that we have understood the possible reasons why the Windows Explorer Search isn’t working, let us head to the fixes.
Restart File Explorer
Restarting File Explorer is perhaps the easiest solution that you can try as it can fix any minor bugs in the service.
Here’s how to do this:
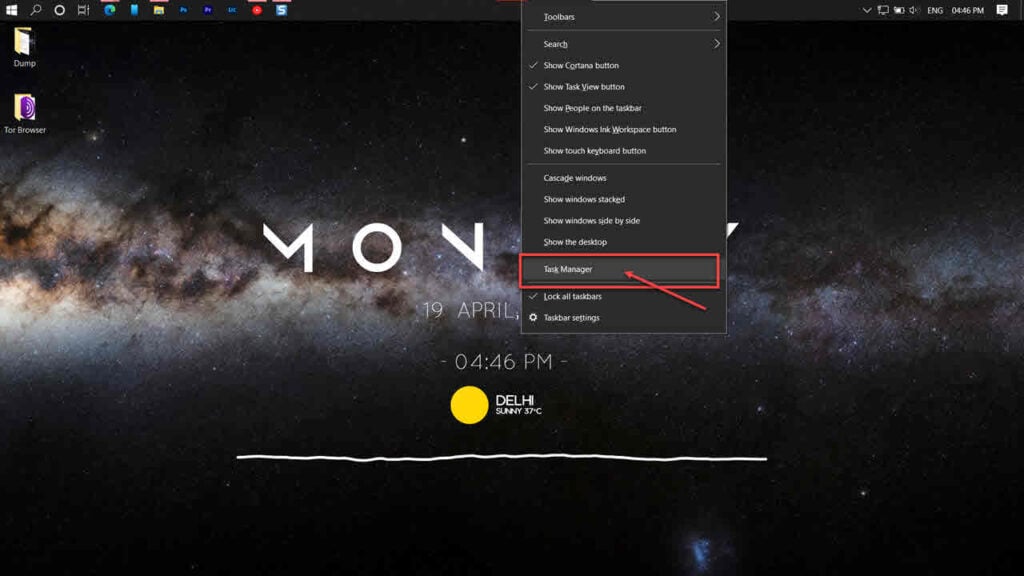
Step 1: Open Task Manager by pressing the Windows key + X and then selecting the option.
Step 2: Locate Windows Explorer and then right-click on the process. Now, select Restart from the drop-down menu.
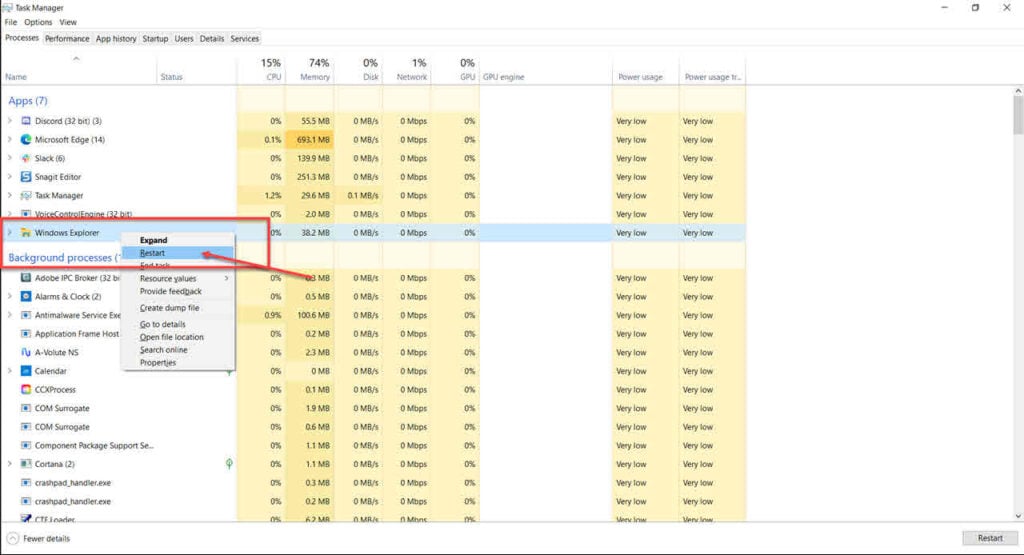
Usually, it will take a few seconds and then it will be all. Now, search for any file or folder on the search box and see if it works. If not, move on to other steps.
Check Windows Search service
Service app in Windows OS allows the user to tweak and manage other background services, applications and processes that are essential for the proper functioning of Windows.
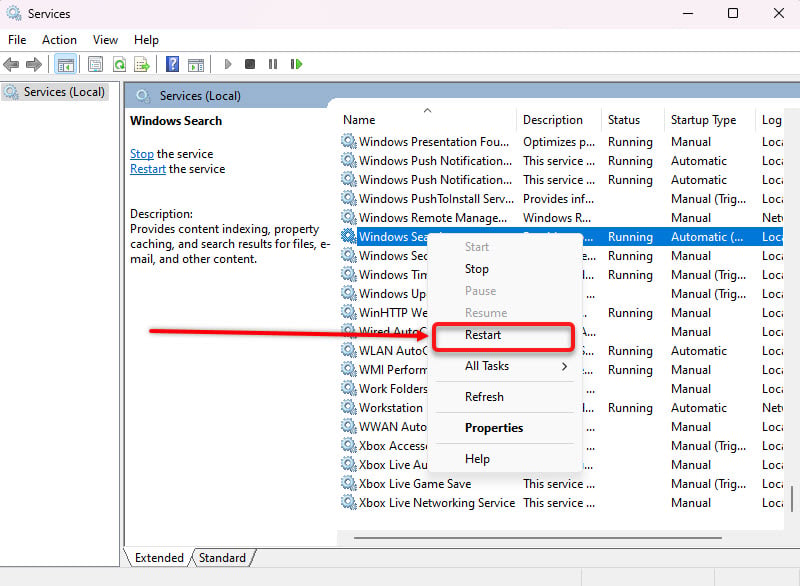
You can check the Windows Search service to assess its status or give it a restart from here.
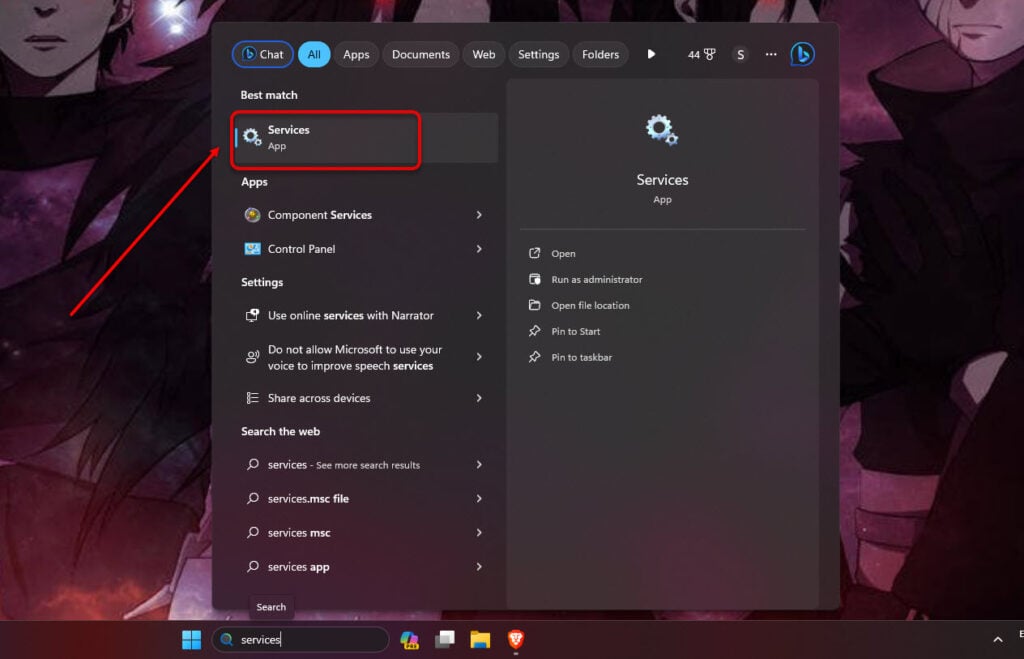
Step 1: Search Service in the search box and then select the relevant option.
Step 2: Locate Windows Search and then double-click on it. Set the Startup type as Automatic which by default, is set to Automatic (delayed). While you’re at it, check the Service status which should show Running.
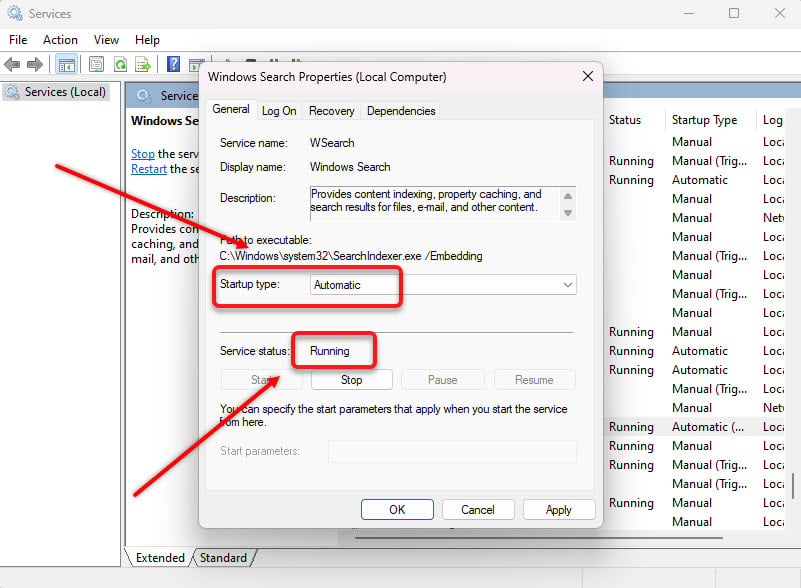
You can also right-click on Windows Search and click Restart to give the process a fresh start.
Tweak File Explorer’s search options
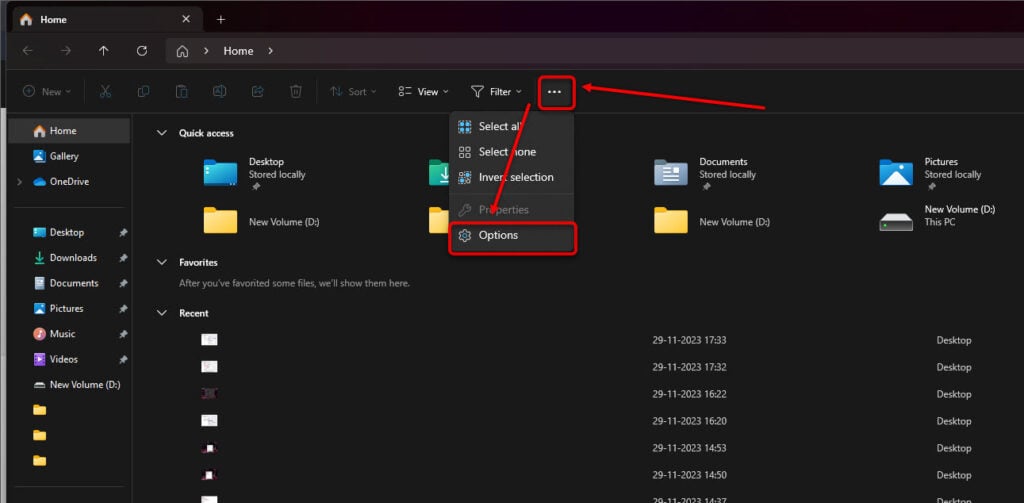
Now it is time for us to work with the File Explore itself. We will head to the Options and tweak the Search settings within that to fix the Windows Explorer Search not working issue.
Step 1: Press the Windows key + E to open the File Explorer. Next, click on the three-dot button and then select Options from the drop-down menu.
Step 2: Now, head to Search and then select all three options. Finally, click on Apply.

Allow file indexing
In Microsoft’s own words: “Indexing is the process of looking at files, email messages, and other content on your PC and cataloguing their information, such as the words and metadata in them. When you search your PC after indexing, it looks at an index of terms to find results faster.”
Many applications in Windows 11 such as File Explorer, Photos and Groove use indexing to find results. However, if the drive doesn’t allow file indexing, then the files of that drive will not be shown in the search.

To fix that, right-click on any local drive on your PC and then select Properties from the drop-down menu. Here, check that there is a tick mark in front of Allow files in this drive to have contents indexed in addition to file properties.
Rebuild search index
As explained in the previous heading, Windows store certain information about the files including the file names and file paths so that the next time you search for that particular file, it will take less time.
The indexing is being done continuously and updates are added automatically. However, due to factors unknown, the indexing process may pause or stop. So, we will have to manually rebuild the search index again.
Here’s how to do this:
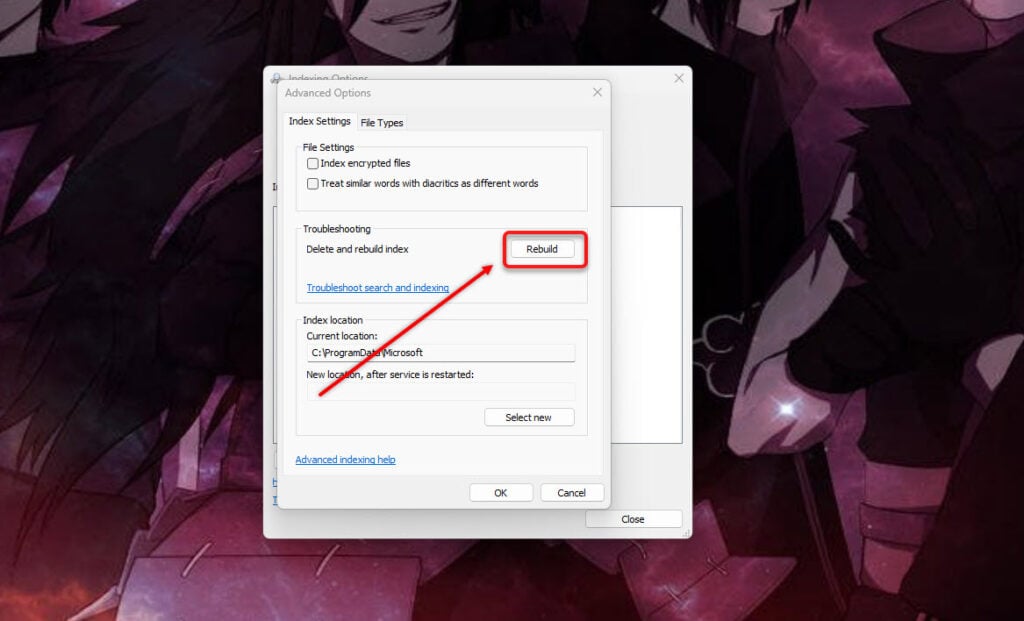
Step 1: Search Indexing options in the search box and then click on the result. You can also head to the Control Panel and then choose Indexing options.

Step 2: Next, click on Advanced.

Step 3: Finally, click on Rebuild index.
Activate Search and Index troubleshooter
Windows has an in-built troubleshooting option for most of the problems including issues with Windows Explorer Search causing it not to work.
Here’s how to run the Search and Index in Windows 11:
Step 1: Press the Windows key + I to open Settings and then select Privacy and security from the left panel. Next, click on Searching Windows.
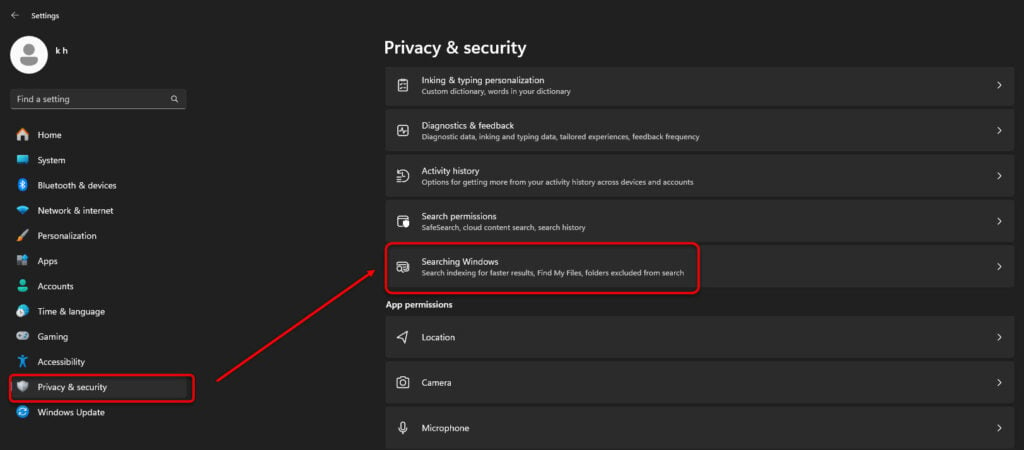
Step 2: Next, click on Indexer troubleshooter.

Next, click on Can’t start a search or see results and then click Next.

Allow permissions to a folder
Sometimes, a particular folder’s permission is withheld by the administrator. To search for that particular folder, you need to enable some permissions.
Here’s how to do that:
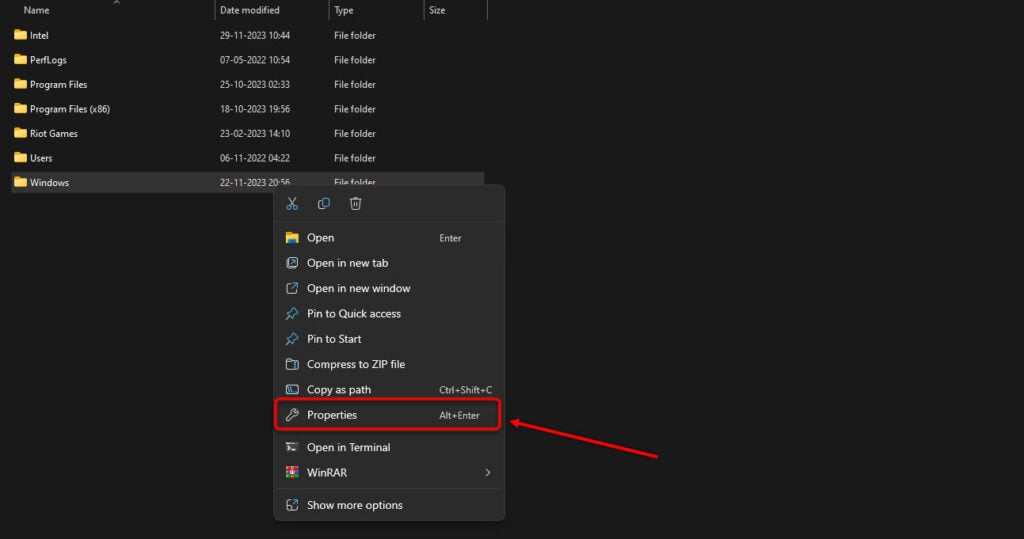
Step 1: Right-click on the folder and then select Properties.
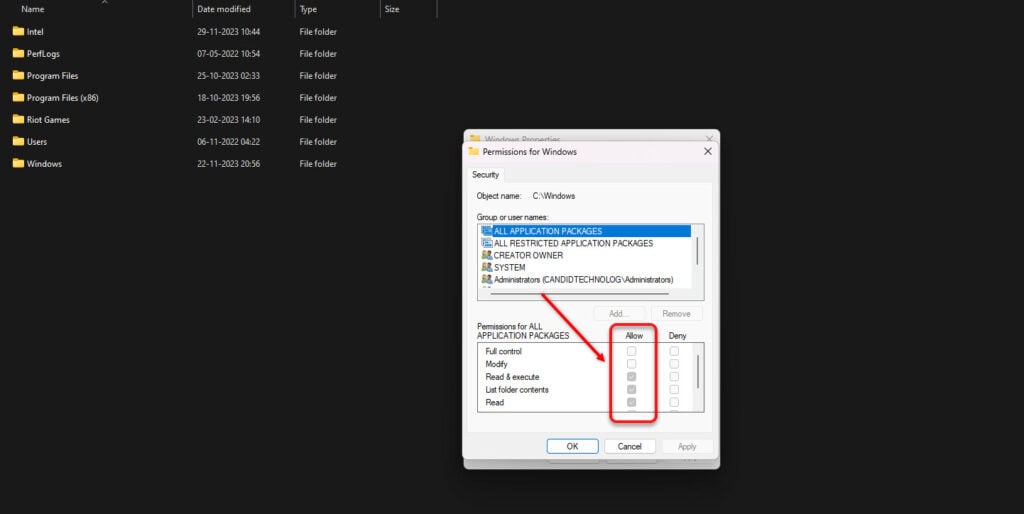
Step 2: Next, head to Security and then select Edit.

Step 3: Checkmark all options under Allow.
Allow System permission to folder
If the normal permission in the previous step doesn’t work, it is time for you to give system permissions to the folder in question. This can help fix the problem of Windows Explorer Search not working on your device.
Step 1: Head to the folder and then right-click on it. After that select Properties > Security > Edit.

Step 2: Next, click on Add.

Step 3: Write SYSTEM and then click on Check Names.

Run malware scan
Malware infection can be one of the reasons why the Windows Explorer Search is not working on your PC.
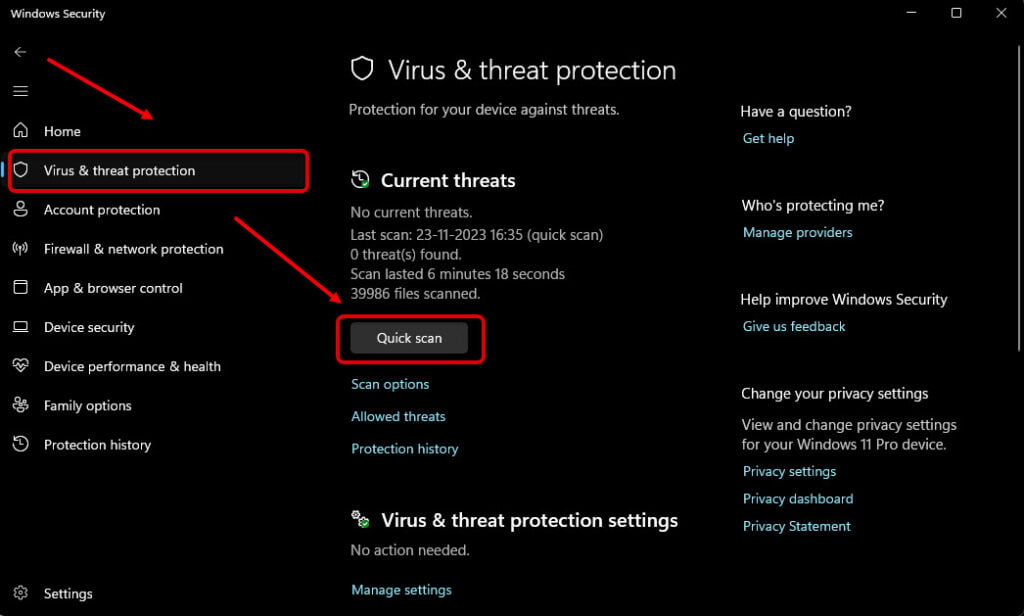
As such, you should run a malware scan to fix corrupt, malware-laden files. Windows offers an in-built Virus and threat protection tool for this purpose. Head to Windows Security and then tap on Virus and threat protection on the left. After that click on Quick scan or Full scan.
Or, you can use any of the several third-party tools like Kaspersky, McAfee and Avast, among others for scanning your PC.
Clear File Explorer cache
Cache are small files that contain the most used apps or processes so that you can access them quickly. But over time, the Windows File Explorer cache can also accumulate corrupt files thereby affecting the Windows Explorer Search and causing it to malfunction.
To fix this, we will have to clear the File Explorer cache:
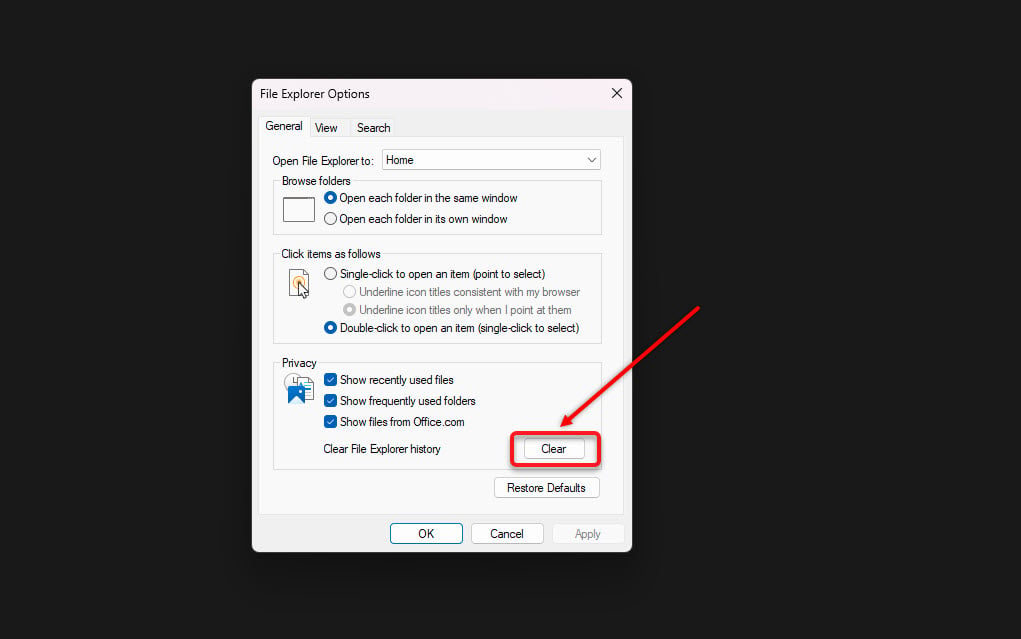
Step 1: Search File Explorer option from the taskbar search box.

Step 2: Click on Clear to clear the cache.
Update Windows OS
Outdated Windows OS may result in the non-functioning of the Windows Explorer Search function.
So, it is imperative that you update your Windows OS ASAP.
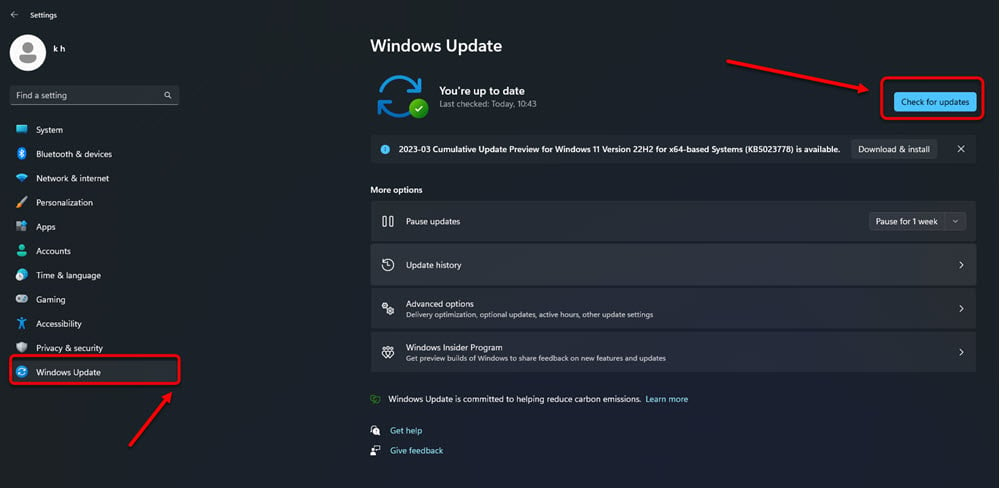
Press the Windows key + I to open Settings. After that head to the Windows Update option at the bottom of the left panel and then click on Check for updates.
In conclusion, it is problematic when the Windows Explorer Search is not working. However, if you follow all the steps correctly, something will click and resolve this issue. Do follow our website for more such how-tos.
Also read: What can the Windows Memory Manager do?


