So you bought a new Windows system recently, and it was working well for the first few months, but now that some time has passed, it does not feel the same. Every time you open a few too many tabs on Google Chrome, your screen freezes, and you can’t take it anymore.
Well, if you are looking for solutions, you have come to the right place. In this article, we will be looking at 13 effective ways of speeding up your Windows system.
Also read: How to fix the ‘Network Discovery is Turned Off’ error in Windows 10?
Disable startup programs
Having a slow Windows startup can be a big turn off. To make your system faster during boot up, you can disable the startup programs running on your system.
To do the same follow the steps given below
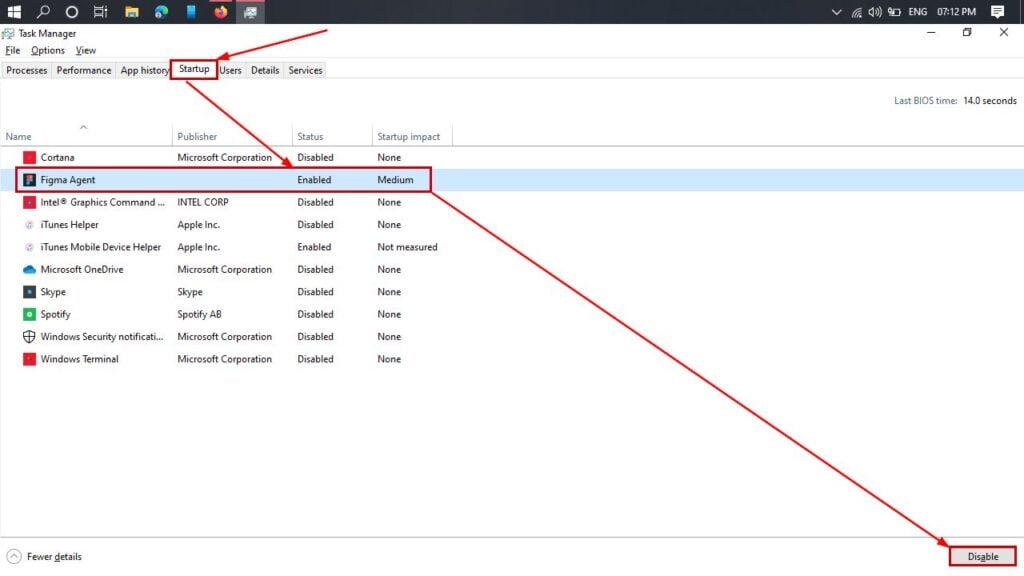
Step 1: Open Task Manager on your system using the shortcut Ctrl + Shift + Esc or find it using the Search bar.
Step 2: Click on Startup, select the applications with an Enabled status, and click on Disable.
Turn off background apps
Several apps on your system can run in the background even if you are not using them. These apps use up system resources like internet bandwidth, processing power, memory and even drain your system’s battery.
To prevent background apps from running on your system, follow the steps given below.
Step 1: Open Windows’ settings by clicking on the start button and thereafter the Settings button

Step 2: Click on Privacy.

Step 3: Scroll down and select Background apps under App permissions and toggle the button below. Let apps run in the background.

Also read: What is CPU cache memory? L1, L2 and L3 cache explained
Block apps that restart after sign in
Windows 10 comes with a feature that remembers the apps which were running before you restart your system. So, when you restart your device, you have the same set of apps open after restarting.
Although this feature can be helpful, it can slow down your system during the startup process. To disable restarting apps, follow the steps given below.
Step 1: Open Windows’ settings by clicking on the start button and thereafter the Settings button.

Step 2: Click on Accounts,

Step 3: Click on Sign-in options and toggle the button below Restart apps,

Disable Cortana
Although Cortana can be helpful sometimes, not a lot of users use the Windows voice assistant. In addition to this, Cortana uses a lot of system resources in the background. So, if you don’t use it frequently, you can disable it by following the steps given below.
We are using a system running Windows 10 Pro for this article. Other versions of Windows might have a different process to disable Cortana.
Step 1: Search for Edit group policy after clicking on start.

Step 2: Click on the drop-down button next to Administrative Templates under Computer Configuration. After this, click on the drop-down next to Windows Components.

Step 3: Click on Search and click on Allow Cortana.

Step 4: Click on Disabled, Apply and then OK.

Step 5: Click on Allow Cortana above lock screen.

Step 6: Click on Disabled, Apply and then OK.

Also read: What is an XLX file? How to open or convert it?
Remove junk files
There are a lot of temporary files on your system. These might include files from old Windows updates, temporary internet files or temporary files generated by the Windows defender.
These temporary files also include the Downloads folder on your system. Ensure that these files are not selected if you don’t want to delete the items in your Downloads folder.
To delete all these temporary files you can follow the steps given below.
Step 1: Open Windows’ settings by clicking on the start button and thereafter the Settings button.

Step 2: Click on System.

Step 3: Click on Storage and then click on Temporary files.

Step 4: Click on Remove files after selecting the temporary files you want to delete.

Adjust visual effects
If you do not have a strong GPU on your system, the animations are managed by both the CPU and the GPU. By reducing these animations, you can offload the CPU’s computations, making room for other tasks.
To change the visual effects on your system, you can follow the steps given below.
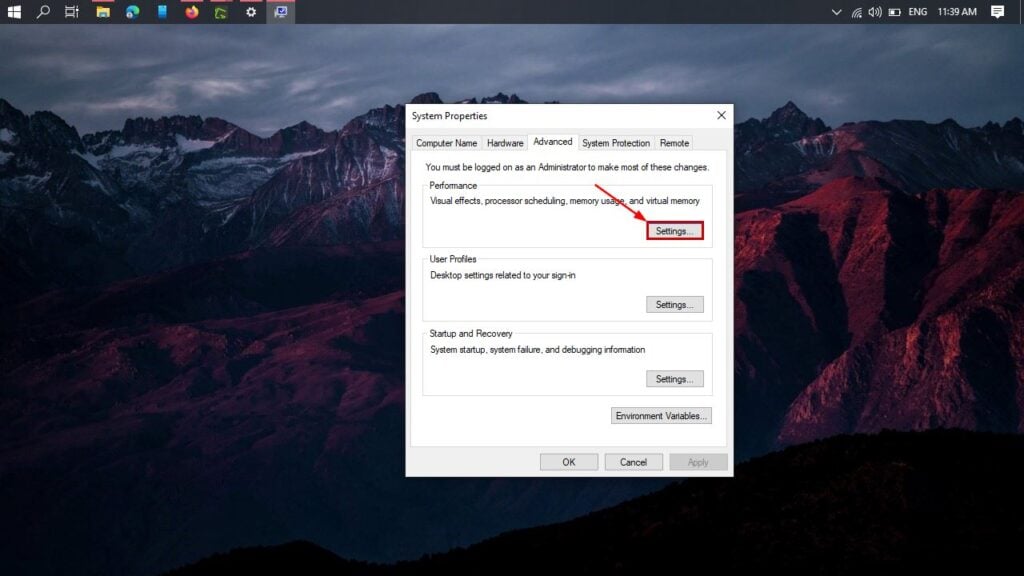
Step 1: Search for system settings after clicking on the start button and click on View advanced system settings.

Step 2: Click on Settings under the Performance category.
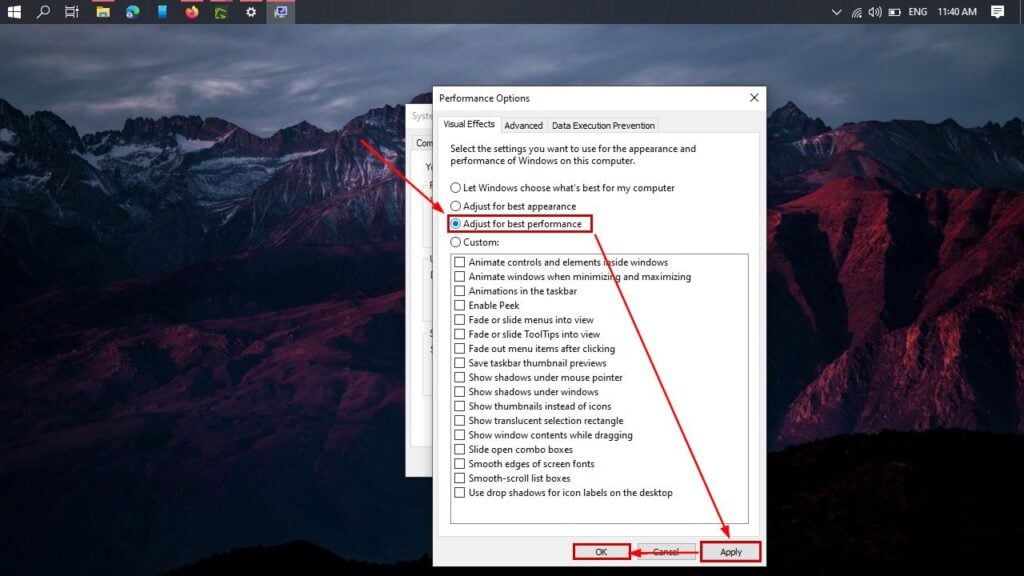
Step 3: Click on Adjust for best performance, Apply and OK.
Also read: How to reduce Excel file size? 7 methods explained
Adjust power options for better performance
Windows offers advanced power options for increasing the battery life of your system. That said, you can tweak some setting to increase the performance of your system at the cost of additional battery usage.
The settings mentioned below could hamper the way your system functions; if this happens, restore your default plans.
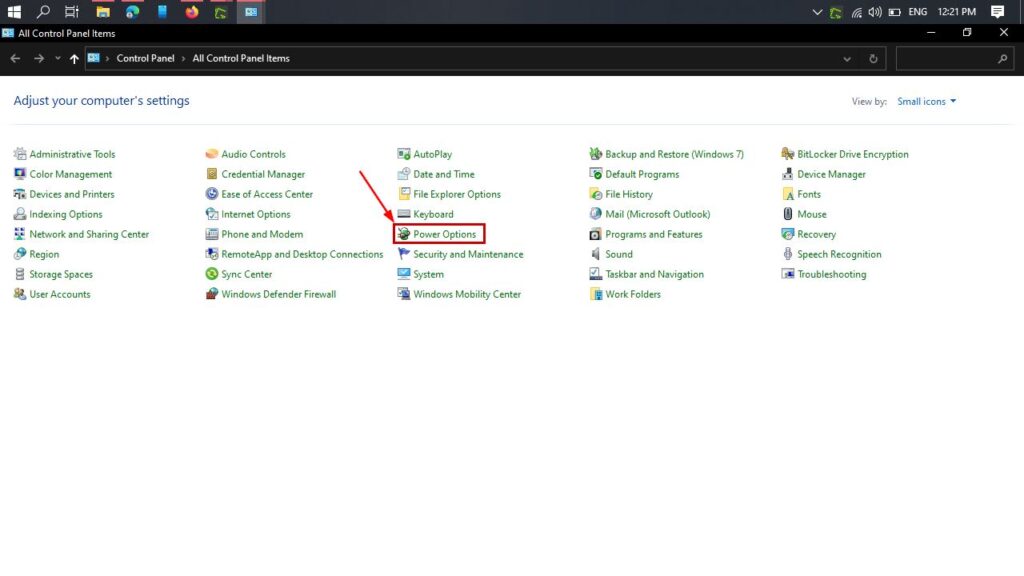
Step 1: Open Control Panel by searching for the same in the start menu.

Step 2: Click on Power options.
Step 3: Click on Change power settings.

Step 3: Click on Change advanced power settings.

Step 4: Click on Wireless Adapter Settings, click on Power saving mode and then select Maximum performance from the drop-down menu.

This setting increases the power consumed by your wireless adapter providing better wireless connection strength. Although this does not make your system faster, it offers better Wifi connectivity for faster browsing.
Step 5: Click on Intel(R) Graphics Settings, then click on Intel(R) Graphics Power Plan and then select Maximum performance from the drop-down menu.
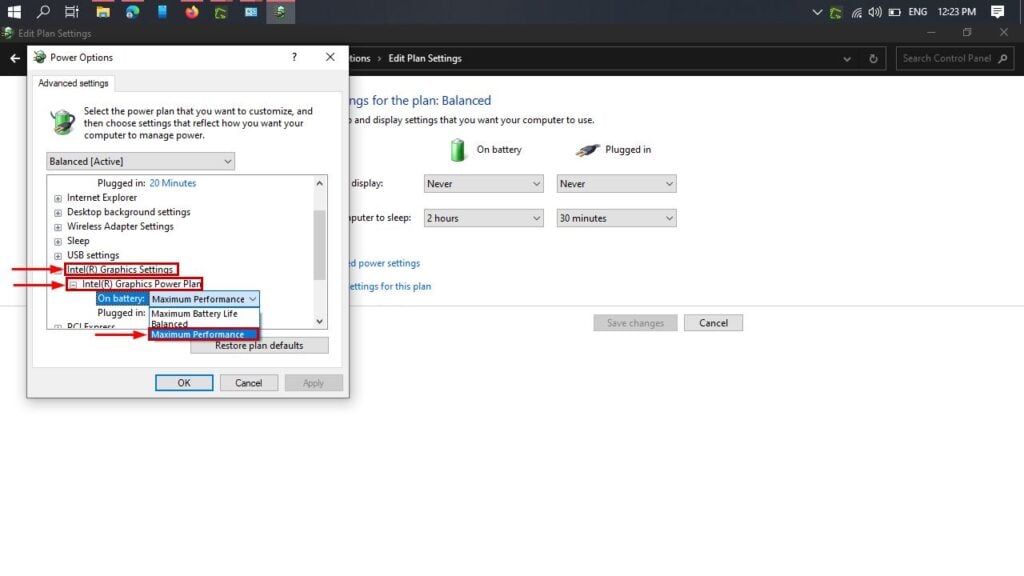
Step 6: Click on Processor power management, then click on System cooling policy and select Active from the drop-down menu.

Step 7: Click on Apply and OK.

Disable delivery optimizations
Windows improves update delivery by using systems on your local area network. Due to this, your system can be used to send updates to other systems consuming your internet bandwidth and storage.
To disable this feature, follow the steps given below.
Step 1: Open Windows’ settings by clicking on the start button and thereafter the Settings button.

Step 2: Click on Update & Security.
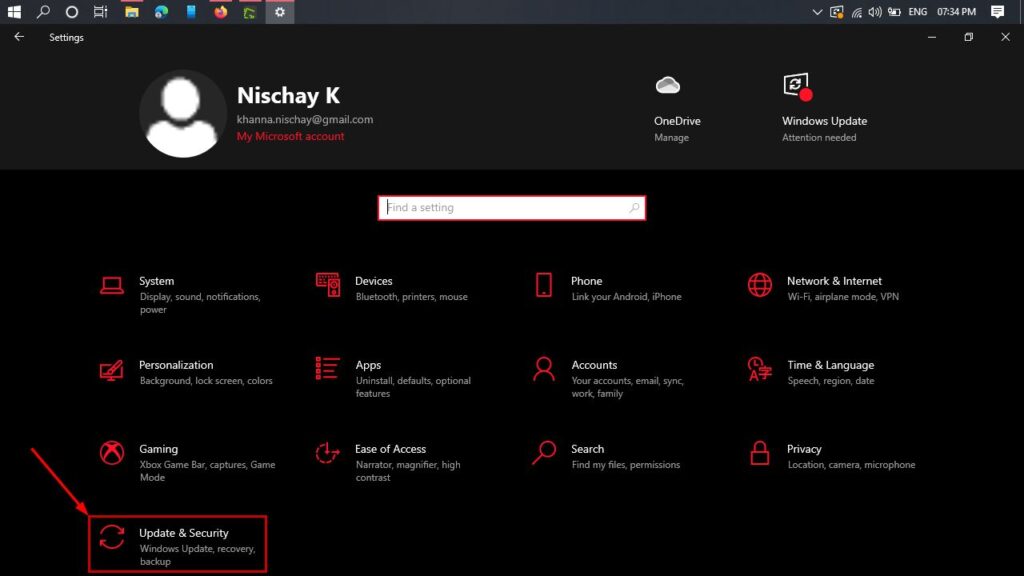
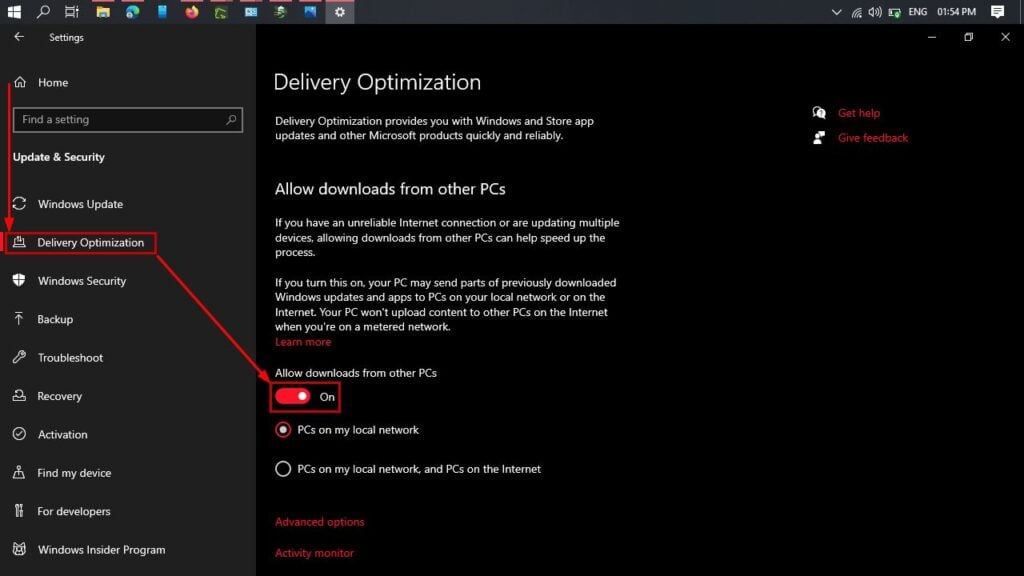
Step 3: Click on Delivery Optimization and toggle the button below Allow downloads from other PCs.
Also read: 6 ways to fix YouTube server error 503
Limit diagnostic data
Windows collects a lot of information about how you use your system. Although you cannot disable this feature, you can limit the amount of data your system uploads to Microsoft.
These frequent uploads can use your memory resources. To limit diagnostic data from your system, follow the steps given below.
Step 1: Open Windows’ settings by clicking on the start button and thereafter the Settings button.

Step 2: Click on Privacy.

Step 3: Click on Diagnostics & feedback select Required diagnostic data.

Disable Windows update
Windows updates are critical for security, and it is quintessential to keep your system up to date. That said, Windows keeps a lot of services running in the background to fetch updates. So, if you are running an old system, you can disable Windows update.
To do the same follow the steps given below.
Step 1: Open run on your system using the Windows + R shortcut search for services.msc and then click on OK.

Step 2: Right click on Windows Update and click on Properties.

Step 3: Select Disabled under Startup type, click on Apply and the click on OK.

Also read: How to open CRDOWNLOAD files?
Disable indexing on your system
Windows indexes the files on your system to make it easier for users to search. Although this makes searching files easy, it consumes a lot of resources. So, if you are running an old system, you can disable this feature.
To disable indexing on your system, follow the steps given below.
Step 1: Open My computer, right click on Local drive C and click on Properties.

Step 2: Uncheck the box next to Allow files on this drive to have contents indexed in addition to file properties, click in Apply and then OK.

Step 3: Select Apply changes to drive c:\ subfolders and files and click on OK.

Step 4: Open run on your system using the Windows + R shortcut search for services.msc and then click on OK.

Step 5: Right click on Windows Search and click on Properties.
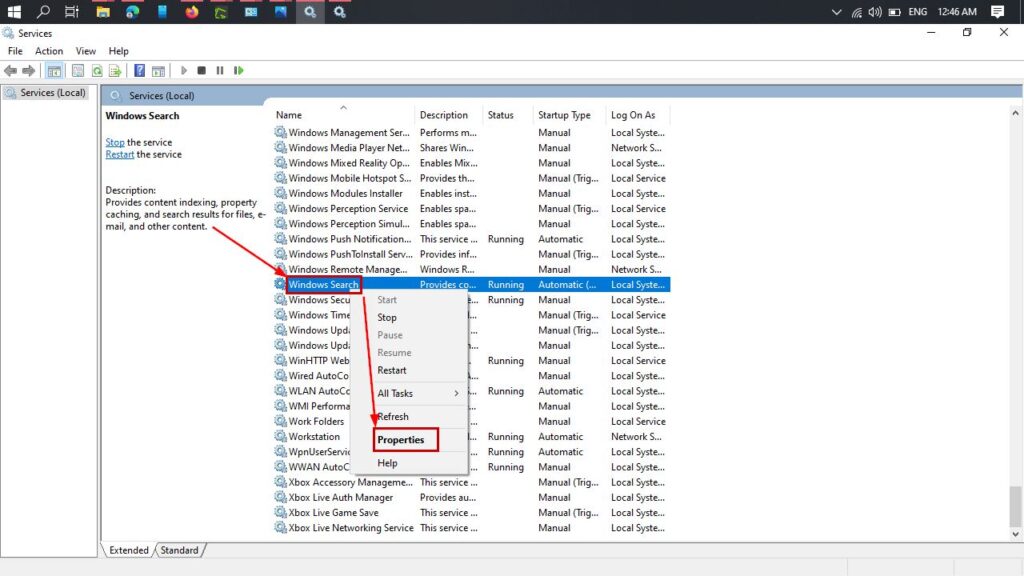
Step 6: Select Disabled under Startup type, click on Apply and the click on OK.

Also read: Openstack vs Openshift: 4 talking points
Debloat your Windows system
When you buy a new system with Windows 10 pre-installed, it comes with a lot of apps you did not ask for. These apps are installed with the operating system, and most of them cannot be uninstalled using traditional methods.
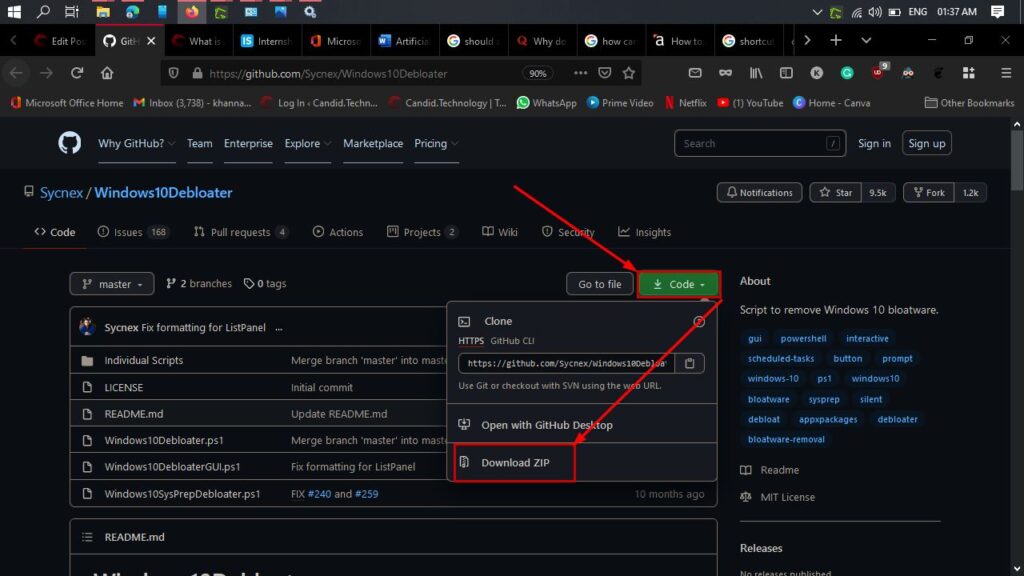
These apps are known as bloatware, and we will be using a program from Github to delete these apps. Follow the steps given below to get rid of these apps.
Step 1: Head to this Github page, click on Code and then click on Download ZIP.
Step 2: Extract the downloaded file.

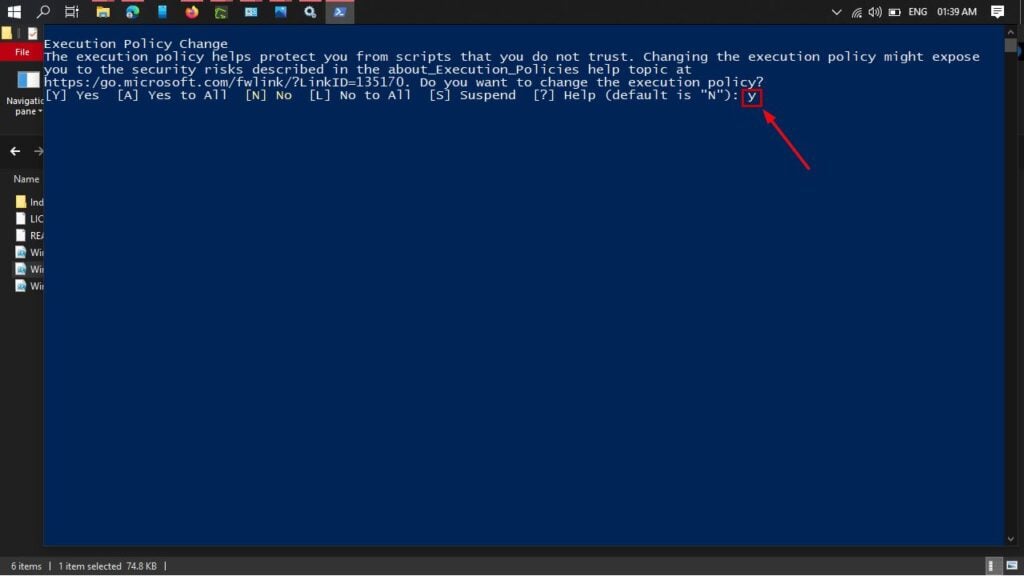
Step 3: Open the extracted folder and right-click on Windows10DebloaterGUI. After that, click on Run with Powershell.

Step 4: Press Y and hit enter in Windows Powershell.
Step 5: Click on REMOVE ALL BLOATWARE.

Manage processes running on your system
Your system runs several processes you might not be aware of; these processes can be critical to your system’s performance. That said, some processes might be consuming a lot of resources and might not be useful for your system as well.
To stop such processes, you can follow the steps given below.
Step 1: Open Task Manager on your system using the shortcut Ctrl + Shift + Esc or find it using the Search bar.
Step 2: Click on the Processes tab, right-click on the process you want to end and click on End task.

After following all these steps, your system will come back to its former glory, and you can go back to opening multiple tabs on your browser.


