With over two billion users, Youtube is the most popular online streaming website in over 100 countries and 80 languages. People watch over a combined billion hours of videos on the platform every day, most of which is user-uploaded.
If you’re thinking of joining the bandwagon of Youtube creators, here we’ve discussed everything you need to know about uploading a video on Youtube.
But before you post or upload a video to Youtube, you should know the following.
- Publish vs Upload: Uploading the video to Youtube doesn’t publish it immediately. First, it’s saved to the drafts on Youtube and you can choose to publish it manually or schedule the video. Once you’ve reached the upload limit, try uploading again in 24 hours.
- Audio files can’t be uploaded to Youtube, which only supports mov, mpeg4, mp4, avi, wmv, mpegps, flv, 3gpp, webm, dnxhr, prores, cineform, and hevc (h265) formats.
- Upload limit: Youtube has a limit to the number of videos that a channel can upload every day, which varies by region and channel history. Community guidelines affect this limit, but copyright strikes don’t.
- Maximum upload size: The maximum file size of a video can be 128GB or 12 hours — whichever is less. Earlier the upload size limit used to be much more, so you might see several videos longer than 12 hours on Youtube. However, you need to have a verified channel to be able to upload videos longer than 15 minutes. Copyright claims and strikes can limit your ability to upload long videos.
- Video quality processing: When you upload a video on Youtube, it’s first processed in standard definition (SD), which allows you to complete the upload flow and even make the video public if you want to sans the high-resolution (4k, 1080p), which take relatively more time to process.
Also read: How to see your subscribers on YouTube?
How to upload and publish a video to your YouTube channel via its website?
Login to your account on studio.Youtube.com, and follow the steps mentioned below to post a video on Youtube.
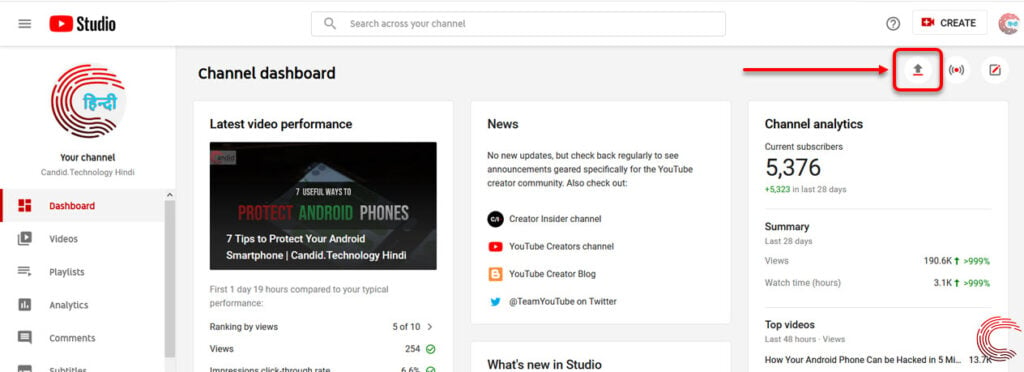
Step 1: Click on the Upload icon near the top-right of the studio window. If you want to go live, you can select the icon to the right, and if you want to put up a post, click on the icon the extreme right.

Step 2: Then click on Select Files button on the Upload videos pop-up window. Your computer’s file explorer will launch; select the video that you want to upload and continue to the next step.

Step 3: Your video will start uploading. You can check the upload progress using the bar at the bottom of the upload screen.

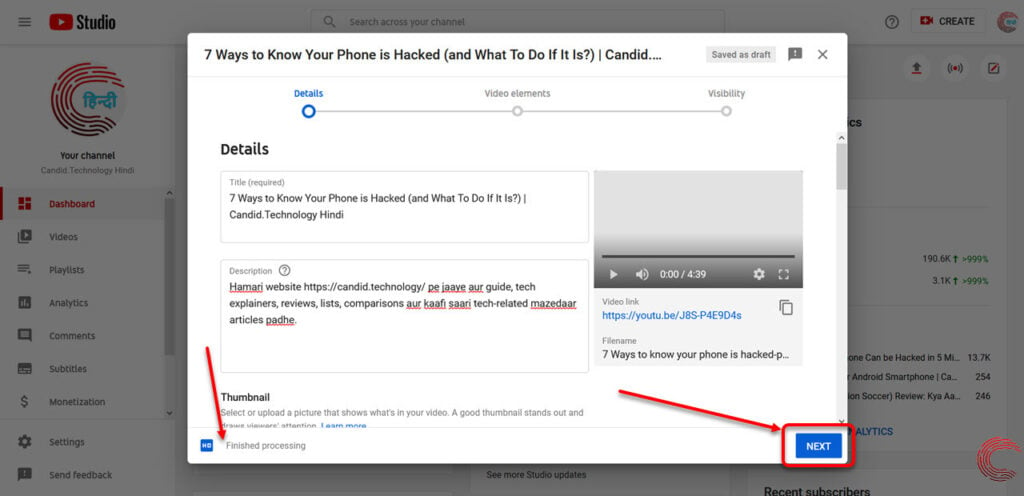
On this page, you can enter the Title of your video, followed by the Description. You can also upload a custom Thumbnail using the option below. Scroll down more to select Playlist, Audience, Age Restriction, Paid Promotion, Tags, Language, Subtitles, Recording date and location, License and Distribution, Category and settings for Comments and ratings.
Step 4: Once the upload is completed, the progress bar will say Finished processing (refer to the screenshot below). Then click on the Next button at the bottom-right of the upload window.

Step 5: On the next page, click on Add beside Add an end screen or Add cards to either promoted related content from your channel at the end of the video and during the video, respectively. Once you’re done, click on the Next button at the bottom-right corner of the upload window.

Step 6: Then select the visibility of your video by choosing to either publish it as a Private, Unlisted, or Public video or Schedule it to be published later. You can also set your video to Premiere, which will create a page for your video with a countdown; you can watch the video alongwith your subscribers and engage with them in live comments.

If at any point during the steps above you accidentally closed the upload window, the video will be saved as a draft and can be found in your Videos list from the options on the left.
While uploading a video using Youtube.com makes more sense as it gives much more customisation as well as advanced settings options, if you aren’t able to access your laptop or PC at the moment and feel like pushing a quick update to your channel, you can also do so using Youtube’s app for Android and iOS.
Also read: How to disable Restricted mode on YouTube?
How to post a video on YouTube’s app for Android and iOS?
Open the Youtube app on your Android or iOS device and follow the steps mentioned below to post a video to your channel.

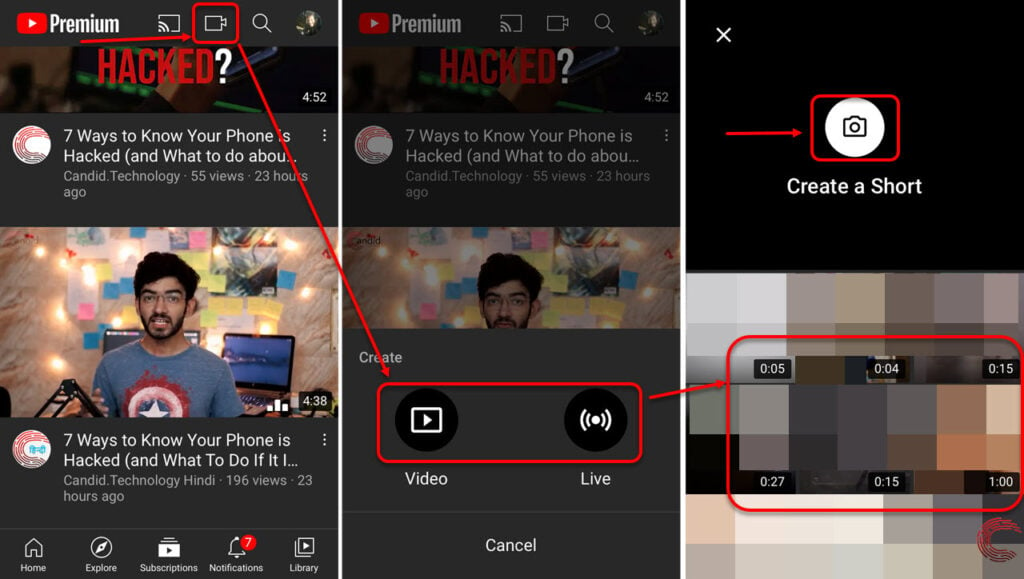
- Tap on the Camera icon at the top of your screen; Plus (+) sign at the middle of the bottom tab on Android (see here).
- Tap on Video if you would like to upload or video or tap on Live if you want to go live on your channel.
- On the next page, either choose a video that’s already on your phone from the camera reel in the second half of the page or tap on Create a Short to shoot a Youtube Short.
- On the next page, you can trim or crop your video using the seek bar at the bottom of the screen. Once you’re done, tap on the Next button at the top-right corner.
- On the next page, enter the Title of your video (refer to the screenshot below), followed by the Description. Select if the video will be public, unlisted or private. Enter a location if you want to and add the video to a playlist using the option at the bottom of the page. Then tap on Next button at the top-right.
- On the next page, select whether or not the video is made for kids and if the video should be restricted to an adult audience.
- Then tap on Upload to publish the video to your Youtube channel.

Also read: How to share a private YouTube video?


