If you’re a hardcore Windows users, you occasionally pop open the Task Manager to check what’s going on under the hood in your system and which process is using what resources. This becomes immensely helpful when your system resources start getting hogged up for no good reason, and you need to diagnose the issue.
The Windows Modules Installer Worker, sometimes called TiWorker.exe in the Task Manager, is one such process that can suddenly take up a lot of CPU and disk resources, causing your system to heat up and a deterioration in performance.
In this article, we’re going over what the Windows modules installer worker process is, why it takes up so many system resources and if it is safe to close the process to save resources. If you’re looking to fix Windows modules installer worker high CPU usage, you can directly scroll down to the section.
Also read: How to automatically delete files from recycle bin in Windows 10?
What is Windows modules installer worker process and what does it do?
According to its service description, Windows modules installer worker ‘enables installation, modification, and removal of Windows updates and optional components’.
In layman terms, this is a system process that’s most likely installing the latest downloaded system updates for Windows 10. However, the process also gets sprung into action when you uninstall an update or add/remove a Windows feature.

So if you see this process using a lot of CPU, your computer has most likely downloaded several updates and now is installing them as you go about your work. While you may or may not need to restart your computer to install said updates, the process will still work in the background doing what it can.
Also read: How to fix the ‘Could not connect to AnyDesk network’ error?
Why does it use so many resources?
More often than not, if you see this process hogging up system resources, there’s nothing wrong with your system. Just updates being installed. There’s nothing you can do about the situation.
The best action to take here is just to let the process run and get it over with. Eventually, it’ll finish installing updates and automatically relinquish its CPU/Disk usage. How long does that take depend on your CPU and Disk speeds and the number of updates that need to be installed.
Also read: 13 effective ways to speed up Windows 10
What can you do to stop Windows modules installer worker high CPU usage ?
Aforementioned, the best course of action here is just to let the process run and install whatever updates required. You might see some advice spread around the internet about disabling it, but we’d strongly recommend against it as it can cause your computer to skip out possibly important updates.
Another rather popular thing people do is to set their WiFi connections as metered. This prevents Windows from download updates in the first place, and in turn, the process doesn’t run. However, once again, this can cause you to skip out on crucial security updates and is not recommended at all.
There have been no reports of malware disguising itself as this process either. This is an important system process and hence, is totally safe. However, if you really think something is off, you can try the following seven solutions to fix Windows modules installer worker high CPU usage.
Run the Windows Update troubleshooter
Run the Windows update troubleshooter to find any underlying issues.
Step 1: Press the Windows key and search for Troubleshoot. Click on the corresponding search result.

Step 2: Click on Additional troubleshooters.

Step 3: Find and run the Windows Update troubleshooter from the list.

Remove the SoftwareDistribution folder
The SoftwareDistribution folder contains Windows update files that are yet to be installed. If there’s a corrupt file in this folder, it can cause the process to get stuck and use up precious system resources.
First up, we’re going to have to disable Windows updates temporarily. Follow these steps to do so.
Step 1: Press Windows key + R to open the Run prompt. Once open, type services.msc and hit enter.

Step 2: Find the Windows Update service and disable it using the Start/Stop button.

Step 3: Now head over to C:/Windows. Find the SoftwareDistribution folder and delete it to proceed.

Restart your PC and check if your issue is resolved.
Restart the Windows Update service
Restarting the Windows Update service can also help freshen up the currently running update process.
Step 1: Press Windows key + R to open the Run prompt. Once open, type services.msc and hit enter.

Step 2: Find the Windows Update service and disable it using the Stop button.

Step 3: Once the service has stopped, wait for about a minute and then restart it by clicking on the Start button.

Run the System File Checker
Running the System File Checker can get rid of any corrupt files in your Windows System Installation and get rid of them.
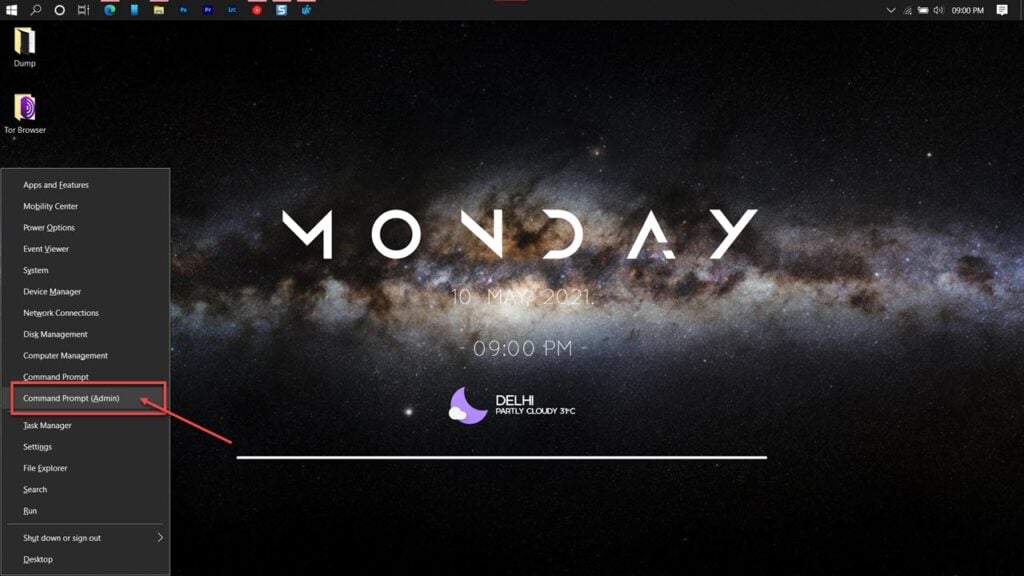
Step 1: Press Windows Key + X and click on Command Prompt (Admin) to run the Command Prompt with admin privileges.

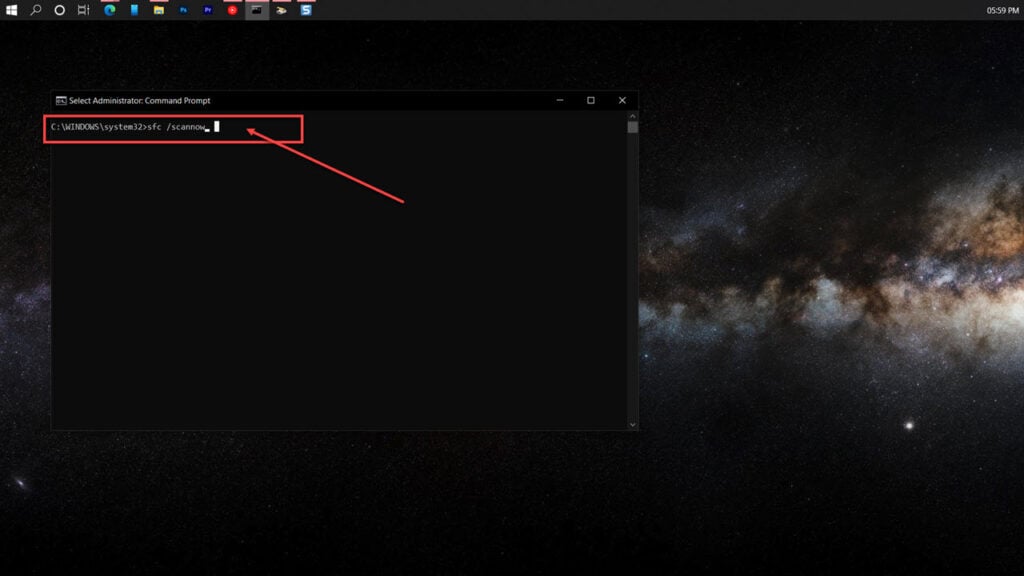
Step 2: Type sfc /scannow to run a system scan.

Restore your PC using DISM
DISM or the Deployment Image Servicing and Management is a tool that can help restore corrupt Windows installations. We’ve already covered how to run this tool to fix any issues with your PC.
Check out our detailed article on restoring your PC using DISM here.
Set your internet connection as metered
Setting your internet connection as metered stops Windows from downloading updates automatically. There are two different approaches here to take depending upon whether you’re using WiFi or ethernet.
When on WiFi
Step 1: Press the Windows key and search for Wifi Settings. Click on the corresponding setting.

Step 2: Select your active Wi-Fi connection.

Step 3: Scroll down an enable the Set as metered connection toggle.

When on Ethernet
Step 1: Press Windows key + I to bring up the Run prompt. Type regedit and press enter

Step 2: Navigate to the following directory.
Computer\HKEY_LOCAL_MACHINE\SOFTWARE\Microsoft\Windows NT\CurrentVersion\NetworkList
Step 3; Right-click on the DefaultMediaCost folder and click on Permissions.

Step 4: Click on Add.

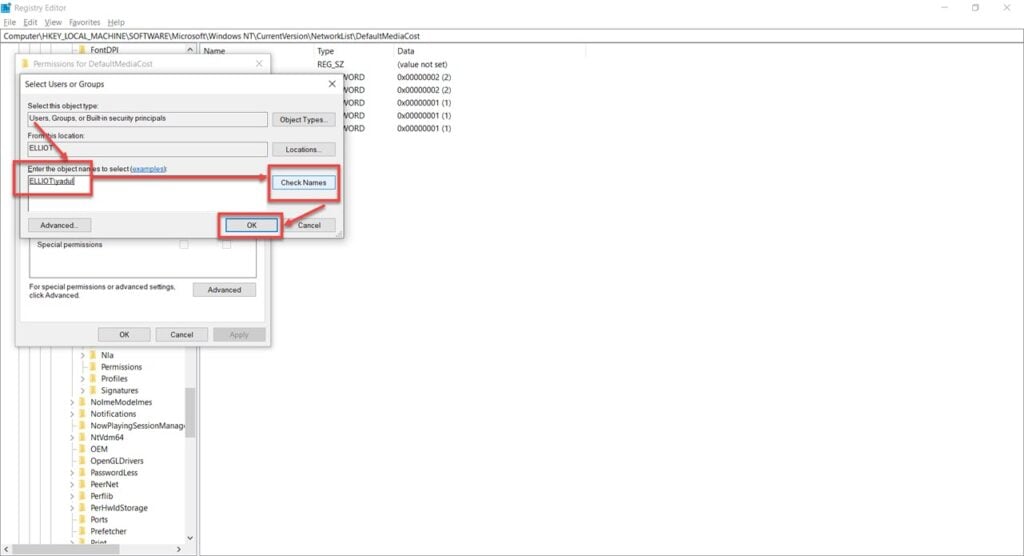
Step 5: Type your username in the Enter the objects to select field and click on Check Names button. Next, click on the OK button.

Step 6: Select the user you just added in the Group or user names list and check the Allow checkbox for Full Control permissions. Click OK when done.

Step 7: Now double click on Ethernet on the right side pane and change its value to 2.

Now restart your computer and the error should be resolved.
Disable automatic updates
Finally, if nothing else works, you can disable automatic updates altogether. Do note that we highly recommend not doing so.
Step 1: Press the Windows key and search for Updates. Click on the corresponding search option.

Step 2: Click on Advnaced Options.

Step 3: Under the Pause updates drop-down, select the date till you want to pause the updates. Note that you can only pause updates for up to 35 days at a time.

Also read: Top 7 free screen recorders for Windows 10


